Transforming a shed into a tiny house is a fantastic way to maximize space, save money, and create a cozy, functional living area. Whether you’re looking for a budget-friendly living solution, a guest house, or a personal retreat, converting a shed into a tiny house can be the perfect project. In this guide, we’ll walk you through everything you need to know to make this transformation a reality, from choosing the right shed and planning your layout to essential modifications and decorating tips.
For those short on time, here’s a quick summary:
- Choose a sturdy shed structure.
- Plan insulation, plumbing, and electrical systems.
- Install windows, doors, and essential amenities.
- Decorate and furnish your tiny home.
Ready to dive deeper? Let’s get started on your shed-to-tiny-house journey!
Why Convert a Shed to a Tiny House?
Contents
Converting a shed into a tiny house offers numerous advantages, making it an attractive option for many. Here are the key reasons why you should consider this transformation:
Cost-Effective Solution
One of the most significant benefits of converting a shed into a tiny house is the cost savings. Building a new tiny house from scratch can be expensive, especially when you factor in materials, labor, and time. In contrast, starting with an existing shed can significantly reduce these costs.
Comparison of Costs:
- Shed Conversion: Generally, converting a shed involves expenses for insulation, electrical and plumbing work, interior finishes, and furnishings. On average, you might spend between $5,000 and $20,000, depending on the size and condition of the shed and the quality of materials used.
- Building from Scratch: Constructing a new tiny house can cost anywhere from $20,000 to $80,000 or more, depending on the design, materials, and labor costs.
By repurposing a shed, you can achieve substantial savings and still create a comfortable, functional living space.
Eco-Friendly Option
Converting a shed into a tiny house is also an environmentally friendly choice. By utilizing an existing structure, you reduce the demand for new building materials and minimize construction waste. This approach aligns with sustainable living principles and helps lower your carbon footprint.
Environmental Benefits:
- Resource Conservation: Repurposing an existing shed means fewer resources are needed for new construction materials.
- Waste Reduction: Minimizing demolition and construction waste contributes to a healthier environment.
- Energy Efficiency: With proper insulation and energy-efficient appliances, a tiny house can be highly energy-efficient, reducing your overall environmental impact.
Choosing to convert a shed into a tiny house is a step towards a more sustainable and eco-friendly lifestyle.
Quick and Straightforward
Another compelling reason to convert a shed into a tiny house is the time efficiency of the process. Building a new tiny house from the ground up can be a lengthy endeavor, often taking several months or even longer. However, converting a shed is typically much quicker and more straightforward.
Timeline Advantages:
- Existing Structure: With the basic structure already in place, much of the groundwork is done, saving you considerable time.
- Simplified Planning: Modifying an existing shed often requires less complex planning and fewer permits compared to new construction.
- Faster Completion: Many shed conversions can be completed in a matter of weeks, depending on the extent of the modifications and the availability of materials and labor.
By choosing to convert a shed, you can enjoy the benefits of a tiny house sooner and with less hassle.
In summary, converting a shed into a tiny house is a cost-effective, eco-friendly, and time-efficient solution that allows you to create a unique and functional living space with minimal impact on your wallet and the environment.
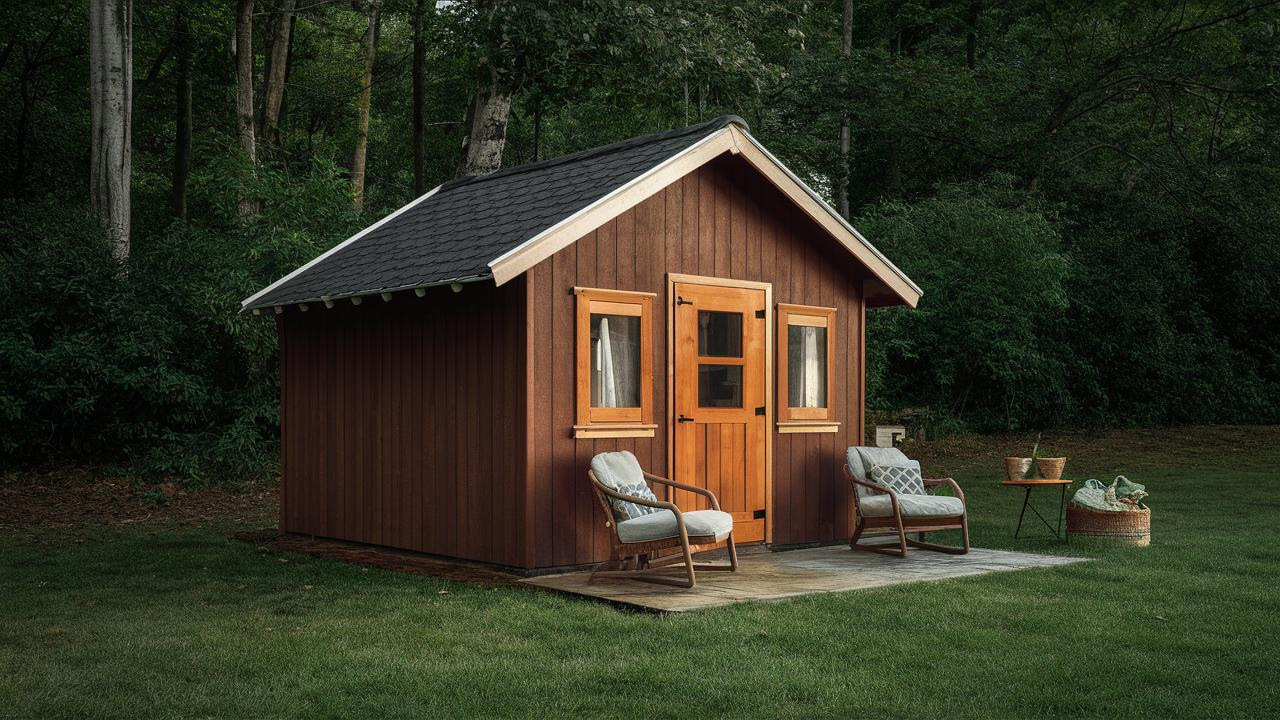
Choosing the Right Shed
Selecting the right shed is a crucial first step in your conversion project. The type of shed you choose will determine the ease of conversion and the comfort of your future tiny house. Here’s an overview of the different types of sheds and key considerations to keep in mind.
Types of Sheds
1. Wooden Sheds
- Overview: Wooden sheds are the most popular choice for conversions due to their durability and ease of modification. They offer a natural, rustic aesthetic that many tiny house enthusiasts love.
- Pros: Easy to insulate and modify, good for DIY projects, aesthetic appeal.
- Cons: Susceptible to rot and pests if not properly maintained, requires regular upkeep.
2. Metal Sheds
- Overview: Metal sheds are known for their durability and resistance to weather conditions. They are less likely to suffer from rot or pest infestations compared to wooden sheds.
- Pros: Long-lasting, low maintenance, resistant to rot and pests.
- Cons: More challenging to insulate and modify, can be prone to condensation issues.
3. Plastic Sheds
- Overview: Plastic sheds are lightweight and resistant to rot and rust. They are typically easy to assemble and require minimal maintenance.
- Pros: Low maintenance, resistant to rot, rust, and pests, easy to assemble.
- Cons: Limited customization options, less durable in extreme weather conditions.
Key Considerations
1. Size Recommendations
- Minimum Size: For a comfortable living space, the shed should be at least 8×12 feet. This size provides enough room for essential amenities such as a bed, small kitchen, and bathroom.
- Optimal Size: Larger sheds, such as those measuring 10×16 feet or more, offer greater flexibility in layout and can accommodate additional features like a living area or extra storage.
2. Importance of a Solid Frame and Good Roofing
- Solid Frame: Ensure that the shed has a sturdy frame that can support the modifications needed for conversion. A solid frame will provide structural integrity and longevity to your tiny house.
- Good Roofing: A reliable roof is crucial to protect your tiny house from weather elements. Look for sheds with durable roofing materials like metal or high-quality shingles. Ensure the roof is well-sealed and capable of supporting additional insulation if needed.
3. Other Considerations
- Location: Consider the placement of the shed on your property. Ensure it’s situated in a spot that provides good drainage, sunlight, and accessibility.
- Permits: Check local building codes and zoning regulations. Some areas may require permits for converting a shed into a livable space.
- Ventilation: Ensure the shed has adequate ventilation to prevent moisture buildup and maintain air quality inside your tiny house.
By carefully selecting the right shed and considering these key factors, you can set a strong foundation for a successful shed-to-tiny-house conversion. The right shed will not only make the conversion process smoother but also ensure a comfortable and durable tiny house for years to come.
Planning Your Conversion
Proper planning is essential for a successful shed-to-tiny-house conversion. This section covers the critical aspects of insulation, plumbing and electrical systems, and layout and design to ensure your tiny house is comfortable, functional, and efficient.
Insulation
Insulation is key to making your tiny house comfortable in all weather conditions. Proper insulation will keep your home warm in the winter and cool in the summer, while also improving energy efficiency.
Types of Insulation Materials:
- Spray Foam Insulation:
- Benefits: Provides excellent thermal insulation, air sealing, and moisture barrier. It expands to fill gaps and can be applied to walls, ceilings, and floors.
- Considerations: More expensive than other options and may require professional installation.
- Fiberglass Insulation:
- Benefits: Cost-effective and widely available. Easy to install in batts or rolls, suitable for walls, ceilings, and floors.
- Considerations: Can be less effective if not installed correctly. Proper safety measures are required during installation.
- Rigid Foam Insulation:
- Benefits: Offers high R-value per inch, moisture resistance, and can be used in walls, roofs, and floors. Easy to cut and fit into spaces.
- Considerations: More expensive than fiberglass and may require precise cutting for a perfect fit.
- Reflective Insulation:
- Benefits: Reflects radiant heat, making it effective in hot climates. Typically used in conjunction with other insulation types.
- Considerations: Less effective in cold climates and must be properly installed to prevent heat transfer.
Plumbing and Electrical
Planning your plumbing and electrical systems is crucial for functionality and safety. These systems should be carefully designed to meet your needs while complying with local building codes.
Plumbing:
- Water Supply:
- Install a water storage tank or connect to an external water source.
- Use PEX tubing for flexibility and durability in tight spaces.
- Waste Management:
- Options include a septic tank, composting toilet, or connection to a municipal sewage system.
- Ensure proper ventilation and drainage to prevent odors and maintain hygiene.
Electrical:
- Power Supply:
- Decide between connecting to the grid, using solar panels, or a combination of both.
- Install a reliable breaker panel to manage electrical circuits safely.
- Wiring:
- Use proper gauge wires and conduit to prevent electrical hazards.
- Plan outlets, switches, and lighting fixtures according to your layout and needs.
Layout and Design
An efficient layout and thoughtful design are vital to maximizing the limited space in your tiny house. Here are some tips to help you create a functional and comfortable living area:
Maximizing Space:
- Multifunctional Furniture:
- Use furniture that serves multiple purposes, such as a sofa that converts into a bed or a dining table that doubles as a workspace.
- Vertical Storage:
- Utilize vertical space by installing shelves, cabinets, and hanging storage solutions.
- Hidden Storage:
- Incorporate storage solutions under stairs, in loft areas, and beneath furniture to keep clutter out of sight.
Design Tips:
- Open Floor Plan:
- Opt for an open floor plan to create a sense of spaciousness. Minimize interior walls and use open shelving to maintain sightlines.
- Light Colors:
- Use light colors on walls and ceilings to make the space feel larger and brighter.
- Natural Light:
- Maximize natural light with large windows, skylights, and glass doors. This will make the space feel more open and inviting.
Essential Modifications
To turn a shed into a comfortable and livable tiny house, you’ll need to make several key modifications. These include installing windows and doors, setting up heating and cooling systems, and ensuring proper lighting. Here’s what you need to know about each of these essential modifications:
Windows and Doors
Energy-Efficient Windows:
- Benefits: Energy-efficient windows help maintain a consistent indoor temperature, reducing heating and cooling costs. They also minimize drafts and improve overall comfort.
- Types: Look for double or triple-pane windows with low-E (low-emissivity) coatings. These windows provide better insulation and UV protection.
- Installation Tips: Ensure windows are properly sealed to prevent air leaks. Consider adding weather stripping for additional insulation.
Insulated Doors:
- Benefits: Insulated doors prevent heat loss during winter and keep your home cool in summer. They also enhance security and reduce noise.
- Types: Choose doors with a solid core and good insulation properties. Steel or fiberglass doors with foam cores are excellent options.
- Installation Tips: Ensure doors are correctly installed with proper seals. Use door sweeps and weather stripping to further improve insulation.
Heating and Cooling
Maintaining a comfortable temperature inside your tiny house is crucial for year-round livability. Here are some heating and cooling options to consider:
Heating Options:
- Mini-Split Systems:
- Benefits: Energy-efficient, provides both heating and cooling, easy to install.
- Considerations: Higher upfront cost but long-term energy savings.
- Portable Heaters:
- Benefits: Affordable and easy to move, suitable for small spaces.
- Considerations: Not as energy-efficient, may require multiple units for even heating.
- Radiant Floor Heating:
- Benefits: Provides consistent warmth, energy-efficient, and silent operation.
- Considerations: Higher installation cost, best installed during initial conversion.
Cooling Options:
- Mini-Split Systems: As mentioned above, these systems provide both heating and cooling.
- Portable Air Conditioners:
- Benefits: Easy to install and move, suitable for small spaces.
- Considerations: May require a window or vent for exhaust.
- Ceiling Fans:
- Benefits: Low energy consumption, enhances air circulation.
- Considerations: Best used in combination with other cooling methods.
Lighting
Proper lighting enhances the livability and ambiance of your tiny house. Focus on both artificial and natural lighting solutions to create a bright and welcoming space.
Benefits of LED Lights:
- Energy Efficiency: LED lights consume less power and have a longer lifespan compared to traditional bulbs.
- Variety: Available in various colors and intensities, suitable for different areas of your tiny house.
- Cost-Effective: Lower electricity bills and reduced replacement costs.
Natural Lighting Solutions:
- Skylights:
- Benefits: Provides natural light during the day, reduces the need for artificial lighting.
- Installation Tips: Ensure proper sealing to prevent leaks and choose energy-efficient models.
- Large Windows:
- Benefits: Maximizes natural light, creates a sense of openness.
- Installation Tips: Place windows strategically to capture maximum daylight and consider privacy needs.
By incorporating energy-efficient windows and doors, effective heating and cooling systems, and strategic lighting, you can significantly enhance the comfort and functionality of your tiny house. These essential modifications are crucial for creating a livable and enjoyable space.
Decorating Your Tiny House
Decorating your tiny house is where you can truly make it feel like home. With thoughtful interior design, smart storage solutions, and personal touches, you can create a cozy, stylish, and functional living space. Here are some tips to get you started:
Interior Design Tips
Using Light Colors:
- Benefits: Light colors make small spaces feel larger and more open. They reflect light, enhancing the brightness and creating an airy atmosphere.
- Suggestions: Opt for whites, pastels, and light neutrals for walls, ceilings, and large furniture pieces. You can add pops of color through accessories and small decor items.
Multifunctional Furniture:
- Benefits: Multifunctional furniture saves space and adds versatility to your tiny house. Each piece serves more than one purpose, which is essential in a compact living area.
- Examples:
- Sofa Beds: A sofa that converts into a bed for sleeping.
- Foldable Tables: A dining table that can be folded away when not in use.
- Storage Ottomans: Ottomans that provide extra seating and hidden storage.
Storage Solutions
Utilizing Vertical Space:
- Benefits: Vertical storage helps maximize every inch of your tiny house. It keeps your belongings organized without taking up valuable floor space.
- Ideas:
- Wall Shelves: Install shelves on walls for books, plants, and decor items.
- Hanging Storage: Use hooks and pegboards for hanging kitchen utensils, coats, and bags.
- Overhead Cabinets: Place cabinets above doorways or high on walls for items you don’t need frequently.
Built-In Furniture:
- Benefits: Built-in furniture is custom-designed to fit your space perfectly. It often includes hidden storage, reducing clutter and increasing functionality.
- Examples:
- Built-In Benches: Benches with storage compartments underneath.
- Under-Stair Storage: Utilize the space under stairs for cabinets or drawers.
- Custom Closets: Create closets that fit the exact dimensions of your tiny house.
Personal Touches
Adding Personal Decor:
- Benefits: Personal decor makes your tiny house feel like home. It reflects your style and personality, making the space uniquely yours.
- Ideas:
- Photos and Art: Display family photos, artwork, and personal mementos.
- Textiles: Use throw pillows, blankets, and rugs to add texture and color.
- Plants: Incorporate indoor plants to bring life and freshness to your home.
DIY Projects:
- Benefits: DIY projects are a cost-effective way to add custom touches to your tiny house. They also give you a sense of accomplishment and ownership.
- Examples:
- Custom Shelving: Build your own shelves to fit specific spaces.
- Repurposed Furniture: Transform old furniture into something new and functional.
- Handmade Decor: Create wall art, cushions, and other decor items that match your style.
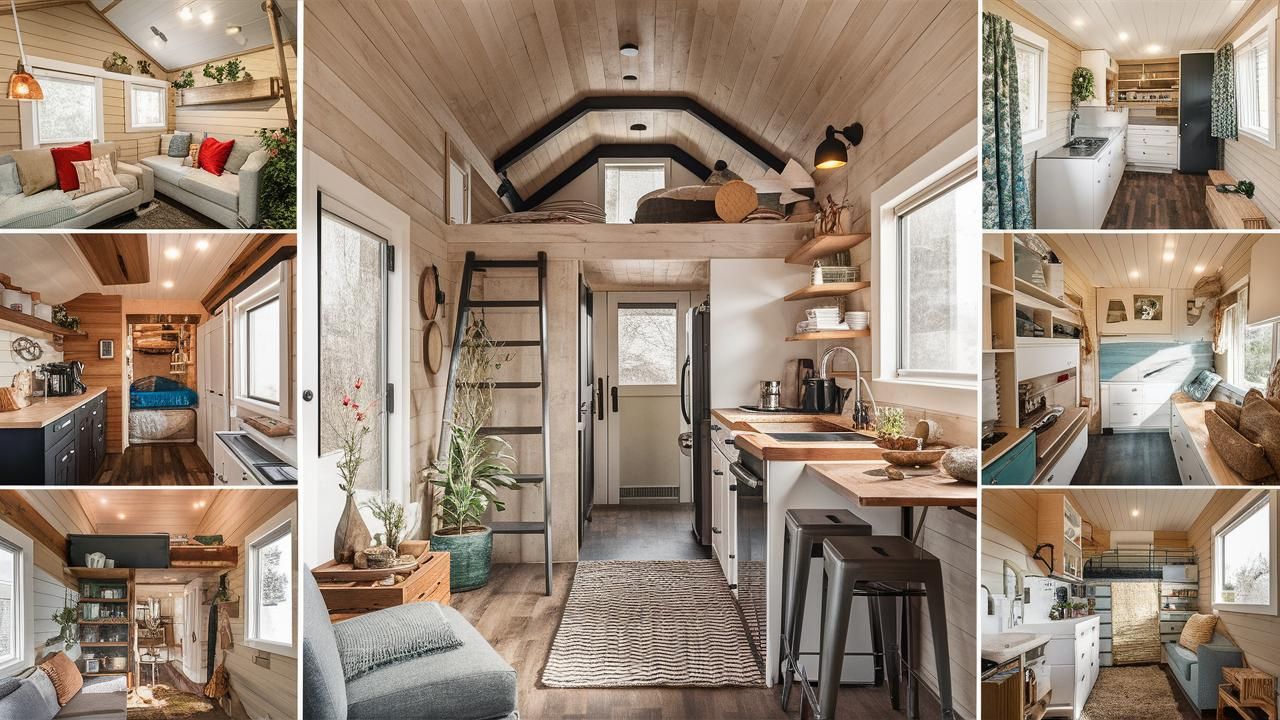
By focusing on light colors, multifunctional furniture, smart storage solutions, and personal decor, you can turn your tiny house into a stylish and comfortable home. Decorating is your chance to express creativity and make the space truly yours.
Cost Breakdown and Budgeting
Understanding the costs involved in converting a shed into a tiny house is crucial for planning and budgeting your project. This section outlines the initial and ongoing expenses, along with tips to save money throughout the process.
Initial Costs
1. Shed Purchase:
- Cost Range: $1,000 to $5,000
- Considerations: The price varies depending on the size, material, and condition of the shed. A larger, well-constructed shed will cost more but provide a better foundation for your tiny house.
2. Professional Services:
- Plumbing:
- Cost Range: $1,000 to $3,000
- Considerations: This includes installing water supply lines, waste management systems, and fixtures. Hiring a professional ensures compliance with local building codes and proper installation.
- Electrical:
- Cost Range: $1,000 to $2,500
- Considerations: Costs cover wiring, installing outlets, switches, lighting, and connecting to the power source. Professional installation is crucial for safety and code compliance.
- Insulation and Interior Finishing:
- Cost Range: $500 to $3,000
- Considerations: Includes the cost of insulation materials, drywall, paint, and other interior finishes.
3. Essential Modifications:
- Windows and Doors:
- Cost Range: $500 to $2,000
- Considerations: Energy-efficient windows and insulated doors improve comfort and energy efficiency.
- Heating and Cooling Systems:
- Cost Range: $500 to $2,000
- Considerations: Options include mini-split systems, portable heaters, and air conditioners.
- Lighting:
- Cost Range: $100 to $500
- Considerations: Includes LED lights, fixtures, and installation.
4. Furniture and Appliances:
- Cost Range: $1,000 to $5,000
- Considerations: Multifunctional furniture, kitchen appliances, and bathroom fixtures.
Ongoing Costs
1. Utilities:
- Electricity:
- Cost Range: $30 to $100 per month
- Considerations: Depending on usage and whether you are connected to the grid or using solar power.
- Water:
- Cost Range: $20 to $50 per month
- Considerations: Includes water supply and sewage costs.
- Heating and Cooling:
- Cost Range: $20 to $100 per month
- Considerations: Varies based on the system used and climate.
2. Maintenance Expenses:
- Routine Maintenance:
- Cost Range: $100 to $500 per year
- Considerations: General upkeep, including cleaning, minor repairs, and inspections.
- Long-Term Maintenance:
- Cost Range: $500 to $2,000 every few years
- Considerations: Larger repairs or replacements, such as roofing, siding, or major appliance updates.
Tips to Save Money
1. DIY Projects:
- Benefits: Doing some of the work yourself can significantly reduce labor costs. Focus on tasks you feel confident in, such as painting, installing flooring, or building simple furniture.
- Considerations: Ensure you have the necessary skills and tools. For complex tasks like plumbing and electrical work, it’s best to hire professionals to ensure safety and compliance with codes.
2. Sourcing Materials:
- Discount Stores: Purchase materials from discount or surplus stores to save money on building supplies, fixtures, and finishes.
- Reclaimed Materials: Use reclaimed or recycled materials for a budget-friendly and eco-friendly option. Look for reclaimed wood, doors, windows, and other building materials.
- Sales and Promotions: Take advantage of sales and promotions at home improvement stores to purchase materials at lower prices.
3. Energy Efficiency:
- Benefits: Investing in energy-efficient appliances and insulation can reduce ongoing utility costs.
- Considerations: Although the initial investment might be higher, the long-term savings on energy bills can be substantial.
By carefully planning and budgeting for both initial and ongoing costs, and by implementing cost-saving strategies, you can make the process of converting a shed into a tiny house more affordable and manageable. These considerations will help you achieve a comfortable and functional tiny house without breaking the bank.
Conclusion
Summary
Converting a shed into a tiny house is an exciting and rewarding project that offers numerous benefits. It’s a cost-effective, eco-friendly, and time-efficient way to create a unique living space. By carefully selecting the right shed, planning your conversion, making essential modifications, and decorating thoughtfully, you can transform a simple shed into a comfortable, functional, and stylish tiny home.
Key steps to remember:
- Choosing the Right Shed: Consider the type, size, and structural integrity of the shed.
- Planning Your Conversion: Focus on proper insulation, plumbing, electrical systems, and layout design.
- Making Essential Modifications: Install energy-efficient windows and doors, set up heating and cooling systems, and ensure proper lighting.
- Decorating Your Tiny House: Use light colors, multifunctional furniture, smart storage solutions, and add personal touches.
- Cost Breakdown and Budgeting: Be aware of initial and ongoing costs and implement cost-saving strategies.
Encouragement
Embarking on the journey to convert a shed into a tiny house can be a fulfilling and transformative experience. It’s an opportunity to create a space that reflects your personality, meets your needs, and embodies sustainable living principles. Whether you’re looking for a full-time residence, a guest house, or a personal retreat, a tiny house offers endless possibilities.
Don’t be intimidated by the process. With careful planning and a bit of creativity, you can achieve your dream of a cozy, functional tiny home. Start small, tackle one step at a time, and before you know it, you’ll be enjoying the benefits of your very own shed-to-tiny-house conversion.
Thank you for reading this guide. We hope it has inspired and equipped you with the knowledge to start your conversion project. Happy building!
Appendix: Additional Resources
Useful Links
Here are some valuable resources and further reading materials to help you with your shed-to-tiny-house conversion:
- Tiny House Basics:
- The Tiny Life: A comprehensive resource on tiny house living, offering tips, guides, and inspiration.
- Tiny House Blog: A blog dedicated to sharing tiny house stories, building tips, and design ideas.
- Building and Design:
- Tiny House Design: Free plans, design tips, and advice on building your own tiny house.
- Houzz: Ideas and inspiration for small space design and organization.
- Insulation and Energy Efficiency:
- Energy.gov: A guide to different types of insulation and their benefits.
- Efficiency Vermont: Tips on making your tiny house more energy-efficient.
- Plumbing and Electrical:
- The Spruce: A beginner’s guide to plumbing in tiny houses.
- Home Depot’s Electrical Guide: Basics of home electrical systems.
- Furniture and Storage Solutions:
- IKEA Small Space Living: Ideas for multifunctional furniture and storage solutions.
- Apartment Therapy: Tips and tricks for maximizing space in small homes.
Recommended Tools and Products
To help you with the conversion process, here’s a list of recommended tools and materials:
Tools:
- Basic Toolkit:
- Hammer, screwdrivers, pliers, tape measure, utility knife, and a set of wrenches.
- Power Tools:
- Drill, circular saw, jigsaw, and a power sander.
- Specialty Tools:
- Stud finder, level, and a staple gun.
Insulation Materials:
- Spray Foam Insulation:
- Great Stuff Pro Gaps and Cracks (available at Home Depot or Amazon).
- Fiberglass Insulation:
- Owens Corning R-13 EcoTouch (available at Lowes or Home Depot).
- Rigid Foam Insulation:
- Foamular 150 Rigid Foam Insulation (available at Home Depot).
Plumbing Supplies:
- PEX Tubing:
- SharkBite PEX Tubing (available at Home Depot or Amazon).
- Plumbing Fittings:
- SharkBite Push-to-Connect Fittings (available at Home Depot).
Electrical Supplies:
- Wire and Cables:
- Southwire 12/2 Romex SIMpull (available at Home Depot or Amazon).
- Electrical Panel:
- Square D Homeline 100 Amp 6-Space 12-Circuit Indoor Main Breaker (available at Lowes or Home Depot).
Windows and Doors:
- Energy-Efficient Windows:
- Andersen 100 Series (available at Home Depot or Andersen’s website).
- Insulated Doors:
- JELD-WEN 36-inch Right-Hand Inswing Primed Steel Prehung Front Door (available at Lowes or Home Depot).
Heating and Cooling Systems:
- Mini-Split System:
- Pioneer Diamante Series Ductless Mini-Split Air Conditioner (available on Amazon).
- Portable Heater:
- Lasko Ceramic Portable Space Heater (available at Home Depot or Amazon).
Lighting:
- LED Lights:
- Philips Hue White and Color Ambiance A19 LED Smart Bulbs (available on Amazon).
- Skylights:
- VELUX Fixed Skylight FS (available at Lowes or Home Depot).
By utilizing these resources and recommended tools, you’ll be well-equipped to tackle your shed-to-tiny-house conversion project successfully.

Leave a Reply