
As we dive into the warmer months of 2024, owning an above ground pool means gearing up for regular maintenance to ensure a clean and safe swimming experience. In this guide, we’ll explore the top 10 essential tools every pool owner should have. From skimmers to brushes, these tools not only simplify your pool upkeep but also extend its lifespan, ensuring endless summer fun. Whether you’re a new pool owner or looking to update your maintenance kit, this list has everything you need!
Dive into summer fun with our top-rated above-ground pool! Click https://www.pooladvisors.net/best-above-ground-pool/ now to transform your backyard into a paradise.
1. Skimmer Net
Contents
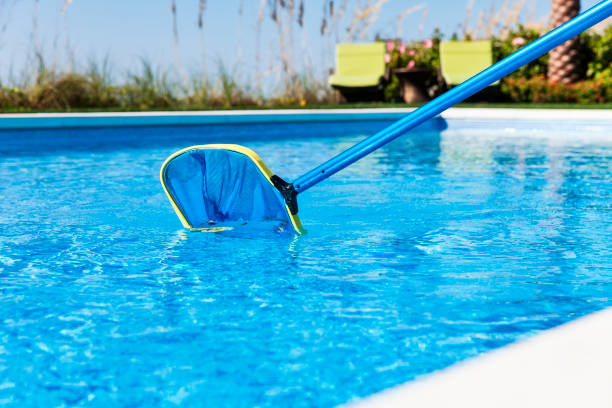
Maintaining a pristine pool starts with the basics, and one of the most fundamental tools in any pool owner’s arsenal is the skimmer net. This simple yet effective tool plays a pivotal role in keeping your pool’s surface clear from debris like leaves, insects, and other unwanted floaters that can cloud your water and clog your filtration system.
Importance of Removing Surface Debris
The significance of regularly skimming your pool cannot be overstated. Not only does it prevent the aesthetic downgrade of having a dirty surface, but it also helps maintain the chemical balance of your pool. Debris in the water can decompose, leading to algae growth and other issues that can throw off the pH and chlorine levels. By using a skimmer net, you ensure your pool remains not just visually appealing but also hygienically safe.
Tips on Choosing the Right Skimmer Net for Your Pool Size
Choosing the right skimmer net involves considering a few key factors:
- Net Size and Shape: Larger pools require larger nets to efficiently cover more surface area. Similarly, the shape of the net should match the corners and contours of your pool to collect debris effectively.
- Mesh Size: Finer meshes can collect smaller particles, making them ideal for pools under trees or in dusty areas. However, they might require more physical effort to drag through the water.
- Handle Length: Ensure the net’s handle is long enough to reach across the widest part of your pool without causing strain. Telescoping handles are excellent for adjusting to different pool sizes and storage spaces.
Best Practices for Regular Use to Optimize Pool Cleanliness
To get the most out of your skimmer net, integrate these best practices into your maintenance routine:
- Daily Skimming: Make it a habit to skim your pool daily, especially if it’s located under trees or in a windy area where debris is more common.
- Proper Technique: When skimming, use gentle, slow strokes. Rushing can push debris away from the net instead of capturing it. Start from the far end of the pool and work your way towards the skimmer basket for the most efficient cleaning.
- Regular Cleaning: After each use, clean the net from accumulated debris. This prevents rot and mold and keeps the net in good condition for longer use.
By following these guidelines, your skimmer net can significantly reduce the workload on your pool’s filtration system and maintain a cleaner, more inviting swimming environment. Regular use and proper maintenance of this simple tool can dramatically extend the life of your pool and enhance your swimming experience.
2. Telescoping Pole

A telescoping pole is an indispensable tool for any pool owner. It serves as the backbone for various pool cleaning tools, such as skimmer nets, brushes, and vacuum heads. The versatility and extendibility of a telescoping pole make it essential for reaching the farthest corners and deepest parts of the pool, ensuring thorough cleaning without the need for constant bending or stretching.
Overview of Different Lengths and Materials
Telescoping poles come in various lengths and materials, each suited for different pool sizes and maintenance needs:
- Lengths: Poles typically range from 5 to 15 feet and can extend up to 21 feet for larger pools. Choosing the right length is crucial; too short, and you’ll strain to reach certain areas, too long, and it becomes unwieldy.
- Materials: Aluminum poles are lightweight and rust-resistant, ideal for most homeowners. Fiberglass poles, while heavier, offer greater durability and are better for commercial applications or pools with heavy use. Some poles feature a blend of both materials, offering a good balance between weight and strength.
How to Attach Tools like Nets and Brushes
Attaching tools to your telescoping pole is straightforward but requires proper technique to ensure safety and efficiency:
- Secure Attachments: Most pool tools attach via a standardized “clip” or “button hole” system at the end of the pole. Ensure that the tool clicks into place securely before use.
- Alignment: Align the tool properly to ensure it is straight and secure. An improperly attached tool can be inefficient and may lead to damage or accidents.
- Switching Tools: When switching between tools, make sure to rinse the pole’s attachment area to remove any grit or debris that might hinder the attachment process or damage the pole.
Storage and Maintenance Tips for Durability
Proper storage and maintenance are key to extending the life of your telescoping pole:
- Rinse After Use: Always rinse your telescoping pole with fresh water after use to remove chlorine, salt, or other chemicals that can corrode the material over time.
- Avoid Sunlight: Store the pole out of direct sunlight when not in use, as UV rays can weaken the material, especially those made from fiberglass.
- Telescope Fully: Periodically extend and retract the pole fully when cleaning it to prevent it from sticking. Ensure it is completely dry before collapsing it for storage to prevent internal mold growth.
- Regular Checks: Regularly check for any signs of wear or damage, particularly around the locking mechanisms and attachment points. Replace any worn parts promptly to maintain its functionality and safety.
By investing in a quality telescoping pole and following these maintenance tips, you ensure that it remains a reliable part of your pool cleaning routine for seasons to come. With the right care, this tool can help keep your pool spotless with minimal effort.
3. Pool Brush

Keeping your pool walls and floor clean is crucial for both aesthetics and hygiene. A pool brush is an essential tool in this regard, designed to remove algae, dirt, and other build-ups that can’t be picked up by a vacuum alone. However, choosing the right brush and using it correctly are important to avoid damaging your pool’s surface.
Types of Brushes for Different Pool Surfaces
Different pool surfaces require different types of brushes to avoid damage while effectively cleaning:
- Nylon Brushes: Ideal for pools with vinyl liners and fiberglass surfaces, nylon brushes are gentle yet effective at removing debris without scratching the surface.
- Stainless Steel Brushes: Best for concrete or plaster pools, these brushes are more abrasive and perfect for tackling stubborn algae and stains. They should not be used on vinyl liners or fiberglass as they can cause damage.
- Combination Brushes: These brushes feature both nylon and stainless steel bristles, designed for tiled pools where gentle cleaning is needed on the tiles but more abrasive scrubbing can be used on the grout.
Techniques for Effective Scrubbing Without Damaging the Liner
Proper technique is crucial when using a pool brush to ensure effective cleaning without causing harm to the pool’s surface:
- Gentle Pressure: Apply gentle, even pressure while brushing. Excessive force can damage the liner, especially if it’s vinyl.
- Consistent Direction: Brush towards the main drain. This helps direct the debris into the drain where it can be more easily vacuumed or filtered out.
- Overlap Strokes: Use overlapping strokes to ensure no spots are missed. This is particularly important in corners and along edges where algae tend to accumulate.
Frequency of Brushing to Prevent Algae Buildup
Regular brushing is key to preventing algae buildup and maintaining a clean, healthy pool:
- Routine Schedule: Brush your pool at least once a week as part of your regular maintenance routine. During peak swimming seasons or in warmer climates, you may need to brush more frequently.
- After Algaecide: Whenever you treat your pool with algaecide, brush the pool thoroughly. This helps the chemicals reach deeper into the pores of the pool’s surface and effectively kill any lurking algae.
- Post-Storm: Always brush your pool after storms or high winds, which can introduce additional debris and contaminants into your pool.
By understanding the types of pool brushes available and applying the right techniques, you can effectively maintain the cleanliness of your pool without causing any damage. Regular brushing not only keeps your pool looking great but also ensures that your chemical treatments are more effective, leading to a healthier swimming environment.
4. Vacuum Head and Hose

A clean pool is an inviting pool, and using a vacuum head and hose is essential for removing debris from the bottom that skimmers and brushes can’t reach. This equipment can be a game-changer in maintaining the clarity and hygiene of your pool water, but it’s important to choose the right vacuum head and understand the proper techniques for effective cleaning.
Choosing the Right Vacuum Head for Your Pool Type
The vacuum head should be matched to the type of pool surface you have to prevent damage and ensure efficient cleaning:
- For Vinyl Liner Pools: Use a vacuum head with brushes or wheels that are designed to be gentle on the liner to avoid punctures or tears.
- For Concrete or Plaster Pools: Opt for a vacuum head with stiff bristles or wheels that can scrub and dislodge tougher debris without damaging the hard surface.
- For Fiberglass Pools: Choose a vacuum head that is smooth and rounded to avoid scratching the gel coating of the pool.
Step-by-Step Guide on How to Properly Vacuum Your Pool
Vacuuming your pool effectively requires following a systematic process:
- Assemble Your Equipment: Connect your vacuum head to the telescoping pole and attach the hose to the vacuum head.
- Remove Air from the Hose: Before connecting the other end of the hose to the pump, submerge it entirely to ensure all air is expelled. This prevents air pockets from entering the pump, which can cause loss of suction and potential damage.
- Connect to the Skimmer or Dedicated Suction Port: Use a vacuum plate if connecting via the skimmer to ensure a tight seal and continuous suction.
- Start in Shallow End: Begin vacuuming from the shallow end and gradually move to the deeper parts. Use long, slow, sweeping strokes to avoid stirring up the debris.
- Overlap Your Strokes: Make sure to slightly overlap each stroke with the previous one to cover all areas and not miss any debris.
- Empty the Pump Basket: Regularly check and empty the pump basket throughout the vacuuming process to maintain good water flow and suction.
Troubleshooting Common Issues with Hoses and Connections
Even with the best equipment, issues can arise. Here are some common problems and how to fix them:
- Loss of Suction: This often occurs if there are leaks in the hose connections. Check all connection points and ensure they are tight and secure. Also, inspect the hose for any cracks or holes that might be letting air in.
- Twisting or Kinking of the Hose: This can restrict water flow and reduce suction. Lay the hose out in the sun to make it more pliable and coil it loosely when storing to prevent kinking.
- Difficulty Maneuvering the Vacuum Head: If the head sticks to the bottom, adjust the suction power if possible. If it’s too difficult to move, this could indicate too much suction. Conversely, if it’s too easy and skips over debris, there might not be enough suction.
By choosing the appropriate vacuum head for your pool type, following a thorough vacuuming routine, and knowing how to troubleshoot common hose and connection issues, you can effectively maintain the cleanliness of your pool, ensuring it remains a healthy and enjoyable environment for everyone.
5. Chemical Test Kit

Maintaining safe swimming conditions in your above ground pool requires diligent monitoring of water chemistry. A reliable chemical test kit is an indispensable tool in your pool maintenance arsenal, enabling you to keep track of pH levels, chlorine concentrations, and other crucial water quality parameters.
Importance of Water Testing for Safe Swimming Conditions
Regular water testing is crucial for several reasons:
- Health Safety: Imbalanced pool water can harbor harmful bacteria and irritants that can cause skin and eye irritation, or more serious health issues.
- Water Balance: Testing helps maintain the correct balance of chemicals in your pool, preventing damage to the pool equipment and liner due to corrosive or scaling water conditions.
- Efficiency: Properly balanced water requires less chemical use to maintain clean and clear conditions, saving you money and time.
How to Accurately Test pH and Chlorine Levels
To ensure your swimming pool’s health and longevity, follow these steps to accurately measure pH and chlorine levels:
- Gather Your Supplies: Ensure your test kit is complete and chemicals are not expired. Kits typically include testing strips or reagents for a more accurate measurement.
- Collect a Water Sample: Dip a clean container about 18 inches below the water’s surface, away from the return jets, to get a representative sample of your pool’s water.
- Apply Reagents or Test Strips: If using reagents, fill the test tube to the indicated line and add the required number of drops. For test strips, simply dip the strip into the water sample and remove it immediately.
- Read the Results: Compare the color change in reagents or strips to the color chart provided with your kit. For digital test kits, follow the manufacturer’s instructions for reading results.
- Adjust Chemicals Accordingly: Based on your test results, adjust your pool chemicals to achieve the recommended pH range (typically 7.4 to 7.6) and chlorine level (1-3 ppm).
Recommendations for Test Kits Based on User Reviews
Choosing the right test kit can be daunting, but user reviews can guide you to reliable options:
- Digital Test Kits: These offer precise readings and are easy to use, but they can be more expensive. The ‘AquaChek TruTest Digital Reader’ is a popular choice for its accuracy and ease of use.
- Reagent Kits: Known for their accuracy, kits like ‘Taylor Technologies’ provide detailed chemical balances and are favored by pool professionals.
- Test Strips: For quick and easy testing, test strips like ‘Poolmaster Smart Test 6-Way Test Strips’ are convenient and offer a good balance between accuracy and cost, suitable for routine checks.
By regularly using a chemical test kit, you can ensure your pool remains a safe and enjoyable environment. Accurate testing and timely adjustments of your pool’s chemical levels are key to prolonging its life and ensuring the health of its users.
6. Chlorine Dispenser

Chlorine is vital for keeping pool water safe by eliminating pathogens and preventing algae growth. A chlorine dispenser automates the distribution of chlorine, offering a more consistent and controlled release than manual methods. Understanding the benefits, types, and safe usage of chlorine dispensers can significantly enhance your pool maintenance routine.
Benefits of Using a Chlorine Dispenser Over Manual Methods
Using a chlorine dispenser offers several advantages:
- Consistent Chlorine Levels: Dispensers ensure a steady and even distribution of chlorine, which is essential for maintaining water quality without the peaks and troughs that manual dosing might produce.
- Convenience: Dispensers reduce the need for frequent manual chemical adjustments, saving time and effort.
- Safety: By automatically handling chlorine, dispensers minimize your direct contact with the chemical, reducing the risk of skin irritation or respiratory issues.
Different Types of Dispensers: Floating, Inline, and Off-line
There are several types of chlorine dispensers available, each suited to different pool setups and preferences:
- Floating Dispensers: These are the most common and inexpensive type. They float around the pool, slowly releasing chlorine. They are easy to use but can provide less consistent chlorine distribution compared to other types.
- Inline Dispensers: Integrated into the pool’s plumbing system, inline dispensers release chlorine directly into the water as it circulates. This method offers more consistent chlorine levels and is great for larger pools.
- Off-line Dispensers: Similar to inline models, off-line dispensers are also connected to the pool’s circulation system but do not require cutting into the existing plumbing. They are attached via hoses, making them easier to install and maintain than inline systems.
Safety Tips and Optimal Placement in the Pool
To maximize the effectiveness and safety of your chlorine dispenser, consider the following tips:
- Regular Monitoring: Check your chlorine dispenser regularly to ensure it is functioning correctly and securely sealed. Refill or adjust as necessary to maintain proper chlorine levels.
- Strategic Placement:
- For floating dispensers, place them away from the pool skimmer and return jets to avoid concentrated areas of chlorine that can damage pool components.
- For inline and off-line dispensers, ensure they are properly connected and check for leaks or signs of wear in the tubing and connections.
- Safety Precautions: Always wear gloves and protective eyewear when handling chlorine and refilling the dispenser. Ensure the dispenser is out of reach of children and pets when not in use.
By choosing the right type of chlorine dispenser and following these safety tips, you can maintain a healthier and more enjoyable pool with minimal effort. A well-maintained dispenser not only keeps your pool water clean but also extends the life of your pool by ensuring balanced chemical levels.
7. Leaf Rake

A leaf rake is an essential tool for any pool owner, particularly useful for removing larger debris such as leaves, twigs, and insects from your pool. Unlike skimmer nets, which are better suited for smaller particles floating on the surface, leaf rakes are designed to handle more substantial debris, both at the surface and settled at the bottom of the pool.
When and How to Use a Leaf Rake Effectively
Timing and technique are key when using a leaf rake for pool maintenance:
- When to Use: The best time to use a leaf rake is after windy days or storms, which tend to blow larger debris into your pool. It’s also wise to do a thorough rake before and after major pool usage.
- How to Use: Start by attaching the leaf rake to a telescoping pole. For surface debris, skim gently across the water surface, allowing the debris to collect in the net. For debris at the bottom, push the rake along the pool floor, pulling debris towards you. Empty the rake frequently as it fills to maintain efficiency and ease of movement.
Comparison of Leaf Rakes Versus Skimmer Nets
Understanding the differences between leaf rakes and skimmer nets can help you choose the right tool for the job:
- Debris Size: Leaf rakes are typically deeper and have larger, more durable nets than skimmer nets, making them ideal for collecting larger debris that skimmer nets might miss.
- Versatility: While skimmer nets are excellent for daily light cleaning of small debris on the water’s surface, leaf rakes can handle both surface and bottom debris, offering greater versatility.
- Efficiency: Leaf rakes can collect a larger volume of debris in a single pass compared to skimmer nets, making them more efficient for post-storm clean-ups or for larger pools.
Care and Maintenance to Extend the Rake’s Life
Proper care and maintenance are essential to prolong the life of your leaf rake:
- Rinse After Use: Always rinse the rake with fresh water after use to remove chlorine, salt, and other chemicals that can degrade the net material over time.
- Dry Properly: After rinsing, allow the rake to dry completely in a shaded area before storing. This prevents mold and mildew growth and avoids the degradation of the net fabric.
- Store Correctly: Store the leaf rake in a cool, dry place out of direct sunlight. UV rays can weaken the net and handle, leading to premature wear and breakage.
- Inspect Regularly: Check for any signs of wear or damage, such as tears in the net or cracks in the handle. Promptly repairing or replacing parts can prevent failures during use, which might otherwise allow debris to escape back into the pool.
By choosing the appropriate tool and following these maintenance tips, you ensure that your leaf rake remains a reliable part of your pool cleaning routine. Effective use of a leaf rake not only keeps your pool looking pristine but also enhances the overall swimming experience by maintaining a cleaner, safer environment.
8. Pool Cover

A pool cover is more than just a barrier to leaves and debris; it serves multiple functions that can enhance the efficiency, safety, and longevity of your pool. Understanding the full range of benefits a pool cover offers, as well as how to select and maintain one properly, is essential for any pool owner.
Advantages of Using a Pool Cover Beyond Debris Protection
Using a pool cover provides several significant benefits:
- Heat Retention: Pool covers help to retain heat in the water, reducing heating costs and extending the swimming season in cooler climates.
- Evaporation Reduction: By covering your pool, you significantly reduce water evaporation. This not only conserves water but also decreases the need for frequent chemical rebalancing, saving you money on water and chemicals.
- Safety: Especially for families with small children or pets, a securely fitted pool cover can provide peace of mind by acting as a barrier to accidental falls into the water.
- Algae Growth Prevention: Pool covers limit the amount of sunlight penetrating the water, which can help reduce the growth of algae, keeping your pool cleaner and easier to maintain.
How to Choose and Fit the Right Cover for Your Pool
Selecting the right pool cover involves several considerations:
- Type of Cover: Solar covers are great for heating and reducing evaporation, while safety covers are robust and designed to prevent accidents. Winter covers are durable, designed to protect your pool during the off-season.
- Size and Shape: Ensure the cover matches the size and shape of your pool for a proper fit. It should adequately cover the entire surface without excessive overhang or gaps where debris could enter.
- Material Quality: Look for covers made from durable, high-quality materials that can withstand the elements, especially if the pool is outdoors. The material should be resistant to tears, rot, and UV damage.
Maintenance Tips to Prevent Wear and Tear
Proper care and maintenance of your pool cover will extend its life and maximize its benefits:
- Regular Cleaning: Clean the cover regularly to remove debris, dirt, and water that collects on the surface. This can be done using a hose, a brush, and mild detergent if necessary.
- Proper Storage: When not in use, store the pool cover in a cool, dry place. Fold it neatly to avoid creases or damage. Consider using a storage bag to protect it from pests and dust.
- Check for Damage: Regularly inspect your pool cover for signs of wear, tears, or damage, particularly along seams and at attachment points. Repair any small tears immediately to prevent them from enlarging.
- Avoid Sharp Objects: Be cautious with tools and other sharp objects near the cover. Even small punctures can compromise the effectiveness and safety of the cover.
By understanding the comprehensive benefits of using a pool cover, choosing the right type, and following these maintenance tips, you can ensure that your pool remains clean, safe, and cost-effective throughout the year. A well-maintained pool cover not only protects your pool but also enhances its overall functionality and ease of use.
9. Algae Brush
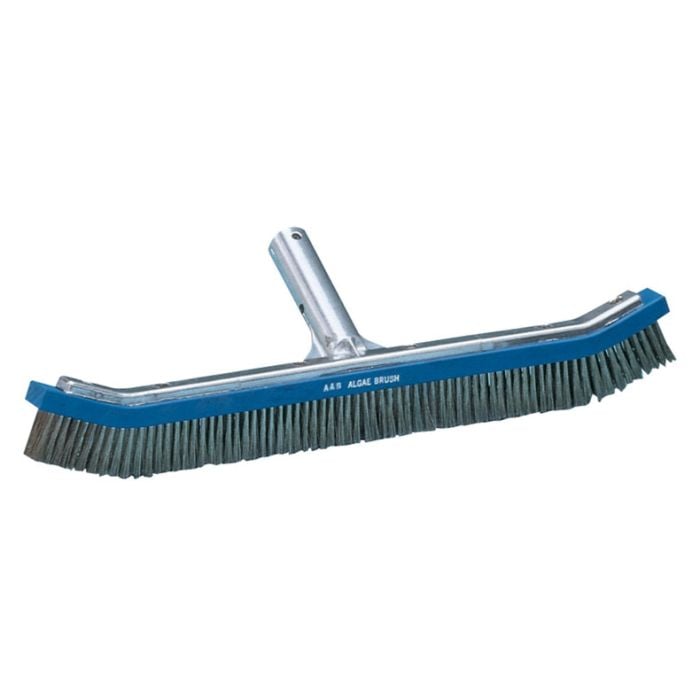
Algae can be one of the most persistent and frustrating issues faced by pool owners. An algae brush is a specialized tool designed to tackle these tough, stubborn growths that normal brushes might not effectively remove. Understanding how to use an algae brush correctly and choosing the right type for your pool surface is key to maintaining a clean and healthy swimming environment.
Specifics on Using an Algae Brush for Stubborn Areas
Algae brushes are designed for rigorous scrubbing, and using them effectively involves a few key techniques:
- Target Stubborn Areas: Focus on spots where algae tend to accumulate, such as corners, steps, and areas with poor circulation.
- Apply Firm Pressure: Algae can cling tightly to pool surfaces. Apply firm pressure with the brush to effectively scrape these areas. However, be mindful of the amount of force used to avoid damaging the pool surface.
- Brush Regularly: During algae blooms, increase the frequency of brushing to disrupt and remove algae before it can establish itself fully. Regular disruption is crucial for preventing the spread.
Metal vs. Nylon Brushes: Which is Best for Your Pool?
Choosing the right brush depends largely on your pool’s construction:
- Metal Brushes: Ideal for concrete or plaster-lined pools, metal brushes are more abrasive and effective at removing algae from harder surfaces. They can break up even the most resilient algae but should never be used on vinyl or fiberglass pools as they can tear or scratch these softer materials.
- Nylon Brushes: Best for vinyl and fiberglass pools, nylon brushes are less abrasive than metal brushes and provide enough scrubbing power to remove algae without damaging the lining.
Safety Precautions to Prevent Damage to Your Pool’s Surface
While algae brushes are effective, they must be used with care to avoid damaging your pool:
- Test Small Area: Before fully committing to scrubbing, test the brush on a small, inconspicuous area of your pool to make sure it doesn’t scratch or damage the surface.
- Use Appropriate Force: Use enough force to tackle algae but not so much that it degrades the pool surface. Observing the effects after a few strokes can guide your pressure application.
- Proper Handling: Always hold the brush at an appropriate angle to maximize efficiency without digging the bristles too hard into the pool lining. Avoid aggressive sideways motion which can damage grout in tiled pools.
By understanding how to properly use an algae brush and selecting the right type for your pool, you can effectively manage and eliminate algae, keeping your pool clean and inviting. Regular maintenance, combined with the right tools and techniques, ensures your pool remains a delightful retreat throughout the swimming season.
10. Water Clarifier
Keeping your pool water sparkling and inviting involves more than just removing visible debris and maintaining chemical balance. A water clarifier is a crucial tool in this process, designed to tackle the microscopic particles that can cause water to become cloudy and unappealing.
How a Water Clarifier Works to Maintain Crystal Clear Water
Water clarifiers work by coagulating (binding together) fine particles into larger aggregates that can be easily filtered out by the pool’s filtration system. Here’s how they work:
- Coagulation Process: Clarifiers contain polymers that act as coagulants, attracting tiny particles that are too small for the filter to catch on their own. These include particles such as dust, pollen, and microscopic algae.
- Enhanced Filtration: Once these small particles form larger clusters, they are more readily captured by the pool’s filter system. This results in clearer water, as the tiny particles that cause cloudiness are removed more efficiently.
Situations That Require the Use of Clarifiers
While routine maintenance can keep your pool clean, there are specific scenarios where a water clarifier can be particularly beneficial:
- After Heavy Usage: Large numbers of swimmers can introduce a variety of substances like sunscreen, oils, and sweat, which can cloud the water.
- Following Severe Weather: Storms and heavy winds can stir up and introduce fine debris into your pool, making the water cloudy.
- Inadequate Filtration: If your pool’s filtration system is underperforming, either due to design limitations or mechanical issues, a clarifier can help by enhancing the filtration capacity temporarily.
Dosage and Application Tips for Best Results
To effectively use a water clarifier and achieve the best results, consider the following tips:
- Follow Manufacturer’s Instructions: The dosage and application instructions can vary widely depending on the brand and type of clarifier. Always refer to the product’s label for specific guidance.
- Proper Mixing: Ensure that the clarifier is well mixed in water (if required) before adding it to the pool. This helps distribute the clarifier evenly throughout the pool.
- Add to the Skimmer: For best results, add the clarifier near the pool’s skimmer. This allows the pump system to distribute the clarifier evenly across the entire pool.
- Monitor Filtration System: After applying the clarifier, keep an eye on the filtration system. The increased load from larger particle clumps might necessitate more frequent cleaning of the filter.
- Adjust as Needed: Start with the minimum recommended dose and only increase if the water does not begin to clear within 24-48 hours. Overdosing can sometimes worsen cloudiness rather than improve it.
Using a water clarifier can significantly improve the clarity and aesthetic appeal of your pool by addressing the microscopic particles that typical filtration systems might miss. With careful application and adherence to dosage recommendations, you can maintain crystal clear pool water that is inviting to all swimmers.
Conclusion
Maintaining an above-ground pool doesn’t have to be daunting—with the right tools in your arsenal, you can easily keep your pool pristine and ready for enjoyment all season long. Remember, regular maintenance not only keeps the water inviting but also extends the life of your pool. Now that you’re equipped with information on the top 10 essential tools for above ground pool maintenance, you’re all set for a splash-tastic summer!

Leave a Reply