
Maintaining the right pH levels in your above ground pool isn’t just about keeping the water crystal clear—it’s about ensuring the safety and comfort of every swimmer and extending the life of your pool equipment. Did you know that improper pH balance can reduce chlorine effectiveness and cause skin irritation? Whether you’re a new pool owner or a seasoned pro, understanding how to manage your pool’s pH levels can save you time, money, and a lot of headaches. Let’s dive into everything you need to know about pH levels in your above ground pool!
Elevate your outdoor space with the ultimate above-ground pool. Click here https://www.pooladvisors.net/best-above-ground-pool/ to purchase and start the fun!
What Are pH Levels and Why Do They Matter?
Contents
pH is a term you’ve probably seen on everything from shampoo bottles to pool maintenance guides, but what does it really mean, especially when it comes to your above ground pool? At its core, pH is a scale that measures how acidic or basic (alkaline) a substance is. This scale ranges from 0 to 14, with 7 being neutral. Anything below 7 is considered acidic, while anything above 7 is basic. So, what does this have to do with your pool water? Quite a bit, actually!
When it comes to your above ground pool, the pH level is crucial because it directly affects the quality of the water and the overall swimming experience. You’ll want to aim for a pH range between 7.2 and 7.8, with the sweet spot being around 7.4 to 7.6. This range isn’t just a random set of numbers—keeping your pool water within this range ensures that the water is balanced, safe, and comfortable for swimmers.
But why is this specific range so important? First off, the pH level significantly impacts the effectiveness of chlorine, which is the primary chemical used to keep your pool water free from harmful bacteria and algae. If the pH level is too low (too acidic), the chlorine in the water becomes hyperactive, burning off more quickly than it should, which can lead to skin and eye irritation for swimmers. On the other hand, if the pH level is too high (too alkaline), chlorine becomes sluggish and less effective, meaning bacteria and algae can thrive even though you’ve added the right amount of chlorine.
Maintaining the ideal pH level also plays a critical role in protecting your pool equipment and surfaces. Water that’s too acidic can corrode metal components like ladders, filters, and other pool accessories, leading to costly repairs or replacements. Meanwhile, overly alkaline water can cause scaling, leaving unsightly deposits on your pool walls, liner, and other surfaces, not to mention it can clog up your filters and reduce their efficiency.
In summary, understanding and maintaining the correct pH level in your above ground pool is essential not only for keeping the water clean and safe but also for ensuring that your pool equipment lasts as long as possible. Regularly testing and adjusting the pH levels in your pool is a simple yet crucial part of pool maintenance that can save you a lot of time, money, and frustration in the long run. So, next time you dip your toes in the water, rest easy knowing you’ve got your pH levels just right!
How to Test pH Levels in Your Above Ground Pool
Testing the pH levels in your above ground pool is a crucial step in maintaining clean, safe, and comfortable water. The good news? It’s not as complicated as it might seem, and with a little practice, you’ll be able to do it quickly and accurately. Let’s break down the different methods available, how to use them, and why regular testing is so important.
Overview of Different Testing Methods
When it comes to testing your pool’s pH levels, you’ve got a couple of main options: test strips and liquid test kits. Both are effective, but each has its pros and cons, depending on what you’re looking for.
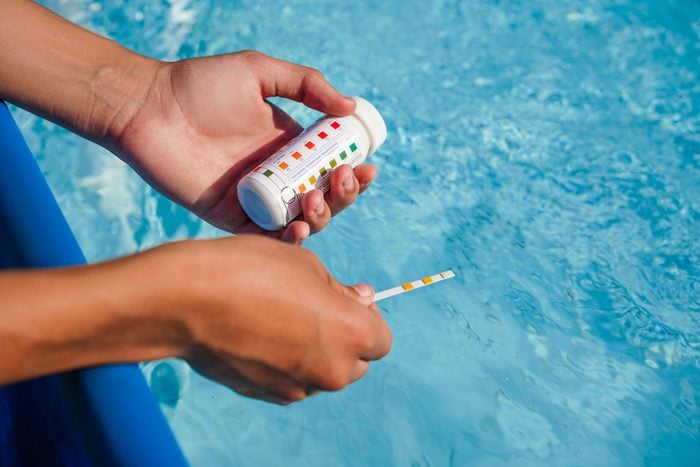
- Test Strips: These are the most common and easiest-to-use option. You simply dip a strip into your pool water and compare the color that appears on the strip to a color chart provided with the strips. Test strips are quick, affordable, and give you a good ballpark figure of where your pH levels stand. However, they might not be as precise as liquid kits.
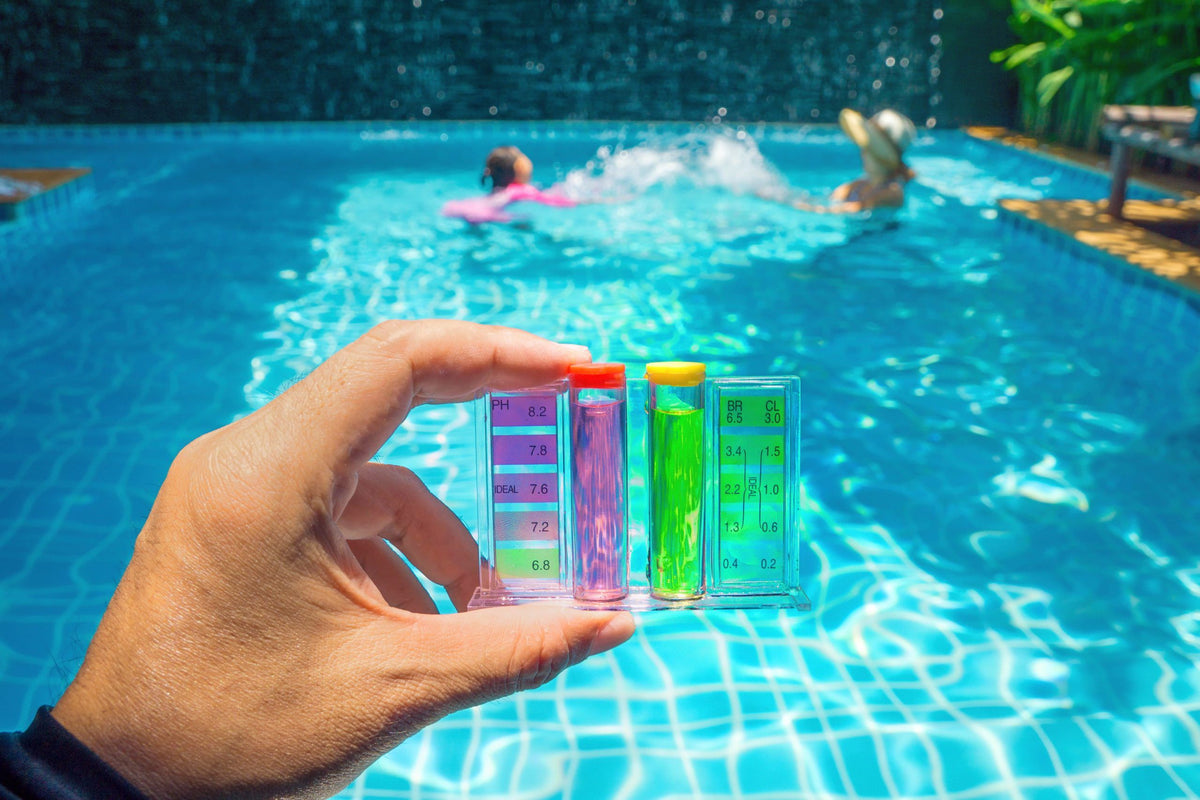
- Liquid Test Kits: These kits involve adding a few drops of reagent to a small sample of your pool water. The water will change color, and you’ll compare it to a color chart to determine the pH level. Liquid test kits tend to be more accurate than strips but require a bit more time and careful measurement.
Both methods are reliable, so the choice between them often comes down to personal preference. If you’re just starting out or prefer something quick and easy, test strips might be the way to go. If you want more precise readings, especially if you’re dealing with persistent pH issues, a liquid test kit could be worth the extra effort.
Step-by-Step Guide to Testing pH Levels Accurately
Testing your pool’s pH level is a straightforward process, but accuracy is key. Here’s a step-by-step guide to ensure you get the best results:
- Gather Your Supplies: Whether you’re using test strips or a liquid test kit, make sure you have everything you need on hand, including clean containers if using a liquid kit.
- Collect Your Water Sample: For the most accurate results, collect a water sample from about 12-18 inches below the surface, away from the pool’s return jets or skimmers. This ensures you’re testing the water that represents the whole pool, not just surface water.
- Test the Water:
For Test Strips: Dip the strip into the water sample, then remove it immediately. Hold the strip horizontally, and wait for the colors to develop (usually about 15 seconds).
For Liquid Test Kits: Add the recommended number of reagent drops to the water sample, then gently shake or swirl the container to mix. Compare the resulting color to the provided chart.
- Read and Record the Results: Compare the color on the strip or in the sample to the chart provided with your test kit. Record your findings, especially if you’re adjusting pH levels frequently or troubleshooting issues.
- Dispose of the Sample: Pour out the tested water sample away from the pool, and rinse any containers you’ve used.
How Often You Should Test the pH Levels and Why Consistency Matters
To keep your pool in top condition, you should test the pH levels at least once a week during the swimming season. However, there are certain times when you might need to test more frequently:
- After Heavy Use: If you’ve had a lot of swimmers in the pool, the pH can change due to sweat, sunscreen, and other contaminants.
- After Heavy Rainfall: Rainwater can alter the pH, especially if it’s acidic.
- After Adding Chemicals: Always test after adding any chemicals to ensure the balance is correct.
Consistency in testing is crucial because pH levels can fluctuate due to various factors, such as weather changes, pool usage, and the addition of chemicals. Regular testing allows you to catch and correct imbalances before they lead to bigger problems, like cloudy water, algae growth, or damage to your pool equipment.
By making pH testing a routine part of your pool maintenance, you’ll ensure that your water stays clear, clean, and safe for everyone to enjoy. So, grab those test strips or liquid kit, and make pH testing a habit—it’s one of the easiest ways to keep your pool in perfect condition!
Adjusting pH Levels: How to Increase or Decrease pH

Once you’ve tested the pH levels in your above ground pool, you might find that they’re not exactly where they need to be. Whether the pH is too high or too low, it’s important to know how to adjust it effectively to maintain a healthy and balanced pool environment. Here’s a guide on when and why you might need to adjust your pool’s pH levels, along with some tips on using the right chemicals safely.
Increasing pH Levels
When and Why You Might Need to Raise pH
If your pool’s pH level dips below the ideal range of 7.2 to 7.8, you’ll need to raise it. A low pH level means your pool water is too acidic, which can cause a number of problems. Acidic water can irritate swimmers’ skin and eyes, corrode metal parts of your pool (like ladders and pump components), and even damage the liner over time. Additionally, low pH can make chlorine less effective, meaning you might end up using more chemicals to keep your pool sanitized.
Introduction to Common Chemicals Like Soda Ash (Sodium Carbonate)
To safely and effectively raise the pH level in your pool, the go-to chemical is soda ash, also known as sodium carbonate. Soda ash is widely available, easy to use, and works quickly to bring your pH back into the optimal range. It’s a reliable solution for balancing acidic water and protecting your pool’s integrity.
Safe and Effective Dosing Guidelines
When it comes to adding soda ash, it’s crucial to follow dosing guidelines to avoid overshooting your target pH. Here’s a basic guideline:
- If your pH is below 7.2, add 1 pound of soda ash per 10,000 gallons of water.
- Avoid adding more than 4 pounds at a time, even if your pH is very low. It’s better to add the chemical gradually and retest the water after about 4 hours. If the pH still needs adjusting, you can add more at that point.
Always spread the soda ash evenly across the surface of the pool, and ensure your pool pump is running to help circulate the chemical throughout the water. After a few hours, test the pH again to see if it’s in the desired range.
Decreasing pH Levels
When and Why Lowering pH Is Necessary
On the other hand, if your pool’s pH level is above 7.8, it’s considered too alkaline. High pH can cause the water to become cloudy, lead to scaling on the pool surfaces, and reduce the effectiveness of chlorine, making it harder to keep your pool clean and safe. It can also make swimmers’ skin feel dry and uncomfortable. In this case, lowering the pH is necessary to bring the water back into balance.
Introduction to Chemicals Like Muriatic Acid and Sodium Bisulfate
To lower the pH, you’ll typically use either muriatic acid or sodium bisulfate (also known as dry acid). Muriatic acid is a strong liquid acid that works quickly to reduce pH, while sodium bisulfate is a safer, granular alternative that’s easier to handle and store. Both are effective, but sodium bisulfate is often preferred by pool owners who want to avoid handling strong acids.
Tips for Adding Chemicals Safely and Avoiding Overcorrection
When adding acids to lower your pool’s pH, safety is paramount. Here are some tips to ensure you’re handling and applying these chemicals correctly:
- For Muriatic Acid: Always wear gloves and goggles when handling muriatic acid. Carefully dilute the acid in a bucket of water before adding it to the pool—never pour acid directly into the pool water. Slowly pour the diluted acid into the pool while walking around the perimeter to ensure even distribution. Run the pump to help circulate the acid and wait at least 4 hours before testing the pH again.
- For Sodium Bisulfate: Sodium bisulfate is easier to use—just measure out the recommended amount according to your pool size and sprinkle it evenly across the water’s surface. Like with muriatic acid, ensure the pump is running to distribute the chemical. Test the pH after several hours to see if further adjustment is needed.
To avoid overcorrection, always add these chemicals in small amounts and retest before making additional adjustments. It’s easier to gradually bring the pH down than to deal with the complications of over-lowering it.
By understanding when and how to adjust the pH levels in your above ground pool, you can keep your water balanced, your swimmers comfortable, and your equipment protected. Regular testing and careful adjustment are key to maintaining the perfect swimming environment.
The Role of Total Alkalinity in pH Balance
Total alkalinity (TA) might not be the first thing that comes to mind when you think about pool maintenance, but it plays a crucial role in keeping your pool’s pH levels stable. Understanding how total alkalinity works and how to adjust it can make a big difference in maintaining a balanced and healthy pool environment.
Definition of Total Alkalinity and Its Impact on pH Stability
Total alkalinity refers to the concentration of alkaline substances in your pool water, primarily bicarbonates, carbonates, and hydroxides. These substances act as a buffer for the pH, helping to prevent drastic changes in the water’s acidity or alkalinity. Think of total alkalinity as the foundation that supports your pool’s pH levels—if it’s too low or too high, your pH can swing wildly, making it difficult to maintain a stable, balanced pool.
When your total alkalinity is in the proper range, it helps to keep your pH steady, even when external factors like rain, swimmer load, or the addition of chemicals threaten to throw it off balance. On the other hand, if your total alkalinity is too low, your pH levels can fluctuate quickly, making it hard to keep the water balanced. If it’s too high, your pH may become difficult to adjust, often staying too high and leading to problems like scaling.
Recommended Total Alkalinity Levels (100-150 ppm)
For the best results, aim to keep your pool’s total alkalinity between 100 and 150 parts per million (ppm). This range provides enough buffering capacity to stabilize pH levels without causing other issues, like cloudiness or scaling. If your total alkalinity is within this range, it will be much easier to manage your pool’s pH levels and maintain a safe, comfortable swimming environment.
Maintaining the proper total alkalinity level also helps protect your pool equipment and surfaces. Water that’s too acidic due to low alkalinity can cause corrosion, while water that’s too alkaline can lead to scaling and cloudy water. By keeping your total alkalinity in check, you’re setting the stage for easier, more effective pH management.
How to Adjust Total Alkalinity Before Managing pH
Before you start adjusting your pool’s pH, it’s important to check and, if necessary, adjust the total alkalinity first. Here’s how you can do it:
- Testing Total Alkalinity: Use a pool test kit or test strips to measure the total alkalinity of your pool water. This will give you a reading in ppm, letting you know if you need to make any adjustments.
- Increasing Total Alkalinity: If your total alkalinity is below 100 ppm, you’ll need to raise it. The most common chemical used for this purpose is sodium bicarbonate, also known as baking soda. To increase the total alkalinity, add 1.5 pounds of sodium bicarbonate per 10,000 gallons of water to raise the TA by approximately 10 ppm. It’s best to add the baking soda in stages, allowing it to dissolve and circulate before testing the water again.
- Decreasing Total Alkalinity: If your total alkalinity is above 150 ppm, you’ll need to lower it. The process is a bit more involved than raising alkalinity and typically requires adding muriatic acid or sodium bisulfate (dry acid). To lower TA, add the acid to one area of the pool while the pump is off, allowing it to create a localized pH drop. After a while, turn the pump back on to circulate the water and test again. This process may need to be repeated over several days to gradually bring the total alkalinity down without overshooting.
- Retest and Adjust: After adjusting the total alkalinity, allow the water to circulate for several hours, then retest to ensure you’re within the desired range. Only once your total alkalinity is properly balanced should you proceed with any necessary pH adjustments.
By addressing total alkalinity first, you create a stable environment that makes it easier to fine-tune your pool’s pH levels. This proactive step can save you from the frustration of constant pH fluctuations and help keep your pool water balanced, clear, and safe for everyone to enjoy.
Common pH Problems and How to Solve Them
Maintaining the proper pH level in your above ground pool is essential, but it’s not uncommon to encounter issues along the way. Knowing how to identify signs of pH imbalance and troubleshoot common problems can save you from bigger headaches down the road. Here’s a guide to recognizing and solving typical pH issues in your pool, along with some tips on preventing them from happening in the first place.
Identifying Signs of pH Imbalance
One of the first steps in addressing pH problems is knowing what to look for. Here are some common signs that your pool’s pH levels might be off:
- Cloudy Water: If your pool water has taken on a cloudy appearance, it could be a sign that the pH level is too high. High pH can reduce the effectiveness of chlorine, allowing contaminants to accumulate and cloud the water.
- Scaling: Scaling occurs when minerals, like calcium, precipitate out of the water and form deposits on pool surfaces. This typically happens when the pH is too high, leading to hard, crusty deposits on pool walls, the waterline, and even the plumbing.
- Corrosion: On the other end of the spectrum, low pH levels can cause water to become overly acidic, leading to corrosion. This can damage metal parts of your pool, such as ladders, handrails, and even the pool’s filtration system, leading to costly repairs or replacements.
- Irritated Skin and Eyes: If swimmers start complaining about stinging eyes, dry skin, or irritation after being in the pool, it could be due to imbalanced pH. Both high and low pH levels can cause discomfort, making it important to keep the water within the ideal range.
Troubleshooting Common pH Issues in Above Ground Pools
Once you’ve identified a pH problem, it’s time to troubleshoot and correct it. Here’s how to address some of the most common pH issues:
- High pH (Above 7.8):
Problem: High pH can lead to cloudy water, scaling, and reduced chlorine effectiveness.
Solution: Lower the pH by adding muriatic acid or sodium bisulfate (dry acid) to the pool. Add the acid slowly and in small amounts, testing the water frequently to avoid overcorrection. Ensure the pool’s filtration system is running to help distribute the acid evenly.
- Low pH (Below 7.2):
Problem: Low pH can cause corrosion of metal components, irritated skin and eyes, and an increased chlorine demand.
Solution: Raise the pH by adding soda ash (sodium carbonate) to the pool. Like with lowering pH, add the soda ash gradually, and test the water after each addition to ensure you reach the desired level without overshooting.
- pH Fluctuations:
Problem: If your pH levels are constantly fluctuating, it could indicate an issue with total alkalinity or external factors like rain, heavy pool use, or the addition of chemicals.
Solution: First, check and adjust the total alkalinity, as this helps buffer pH levels and keeps them stable. Aim for a total alkalinity level of 100-150 ppm. Additionally, test the water more frequently during periods of heavy use or after rainfall to catch and correct imbalances early.
Preventative Measures to Keep pH Levels in Check
Prevention is always better than cure, especially when it comes to maintaining the right pH balance in your pool. Here are some tips to help keep your pH levels in check:
- Regular Testing: The best way to prevent pH problems is to test your pool water regularly—at least once a week during the swimming season, and more often after heavy use, rain, or chemical adjustments. Regular testing allows you to catch pH imbalances before they become serious issues.
- Balanced Total Alkalinity: Always ensure your total alkalinity is within the recommended range of 100-150 ppm. This provides a buffer that helps keep your pH stable, making it easier to maintain the ideal levels.
- Gradual Chemical Adjustments: When adjusting pH, always add chemicals in small increments and test the water frequently. This helps prevent overcorrection, which can lead to pH fluctuations and other problems.
- Proper Pool Maintenance: Keeping your pool clean and well-maintained also helps prevent pH imbalances. Regularly remove debris, clean filters, and check that your filtration system is working efficiently. A well-maintained pool is less likely to develop issues with pH.
By keeping an eye on your pool’s pH levels and addressing any issues promptly, you can ensure that your above ground pool stays clear, comfortable, and safe for everyone to enjoy. Regular maintenance and preventative measures will not only save you time and money but also keep your pool in top condition all season long.
Routine Maintenance: Keeping Your Pool’s pH Balanced
Maintaining the right pH balance in your above ground pool isn’t a one-time task—it’s an ongoing process that requires regular attention. By incorporating routine maintenance into your pool care regimen, you can keep the water in optimal condition all year long. Let’s explore why regular testing and adjustment are so important, how seasonal changes can affect pH levels, and some best practices for year-round pH management.
Importance of Regular Testing and Adjustment
Regular testing and adjustment of your pool’s pH levels are crucial for several reasons. First and foremost, pH levels can fluctuate due to a variety of factors, including rain, pool usage, and the addition of chemicals. Without regular monitoring, these fluctuations can lead to problems such as cloudy water, scaling, or even damage to your pool equipment.
Testing your pool’s pH at least once a week during the swimming season allows you to catch any imbalances early, before they develop into more serious issues. It’s also important to test the pH after heavy rains, a large number of swimmers, or after adding chemicals to the pool. Regular testing gives you the information you need to make timely adjustments, ensuring the water remains balanced, safe, and comfortable for swimmers.
When adjustments are needed, it’s best to make them gradually. Adding chemicals in small amounts and testing the water afterward helps prevent overcorrection, which can cause the pH to swing too far in the opposite direction. This careful approach not only keeps your pool’s pH in the ideal range but also helps extend the life of your pool and its components.
Seasonal Changes and Their Effects on pH Levels
Seasonal changes can have a significant impact on your pool’s pH levels, making it important to adjust your maintenance routine accordingly. Here’s how different seasons can affect your pool’s pH:
- Spring: As you open your pool for the season, you may find that the pH is out of balance due to accumulated debris, rainfall, or lack of circulation during the winter months. It’s crucial to test and adjust the pH as part of your pool-opening routine to ensure a smooth start to the swimming season.
- Summer: During the hot summer months, your pool will likely see more use, and the warm temperatures can accelerate chemical reactions in the water. High levels of sunlight can also cause chlorine to break down more quickly, potentially leading to pH fluctuations. Regular testing and adjustment are especially important during this time to keep the water balanced and safe.
- Fall: As the weather cools and pool usage decreases, you might notice a change in the water’s chemistry. Falling leaves and other organic matter can affect pH levels, making it important to keep up with testing and adjustments even as the swimming season winds down.
- Winter: If you close your pool for the winter, it’s still important to balance the pH before covering it. Even though the pool won’t be in use, maintaining the correct pH helps protect the pool surfaces and equipment from corrosion or scaling during the off-season. When you reopen the pool in the spring, you’ll have a much easier time getting the water back to optimal conditions.
Best Practices for Year-Round pH Management
To keep your pool’s pH levels balanced throughout the year, here are some best practices to follow:
- Set a Testing Schedule: Establish a routine testing schedule, aiming for at least once a week during peak swimming season. During the off-season, test the water at least once a month if the pool remains open.
- Monitor Weather Conditions: Keep an eye on the weather, particularly rainfall and temperature changes, as these can affect pH levels. Be prepared to test and adjust the pH after significant weather events.
- Use Quality Testing Kits: Invest in a reliable testing kit, whether you prefer test strips or liquid test kits. Accurate readings are essential for making the right adjustments.
- Balance Total Alkalinity First: Before adjusting the pH, make sure the total alkalinity is within the recommended range of 100-150 ppm. Proper total alkalinity helps stabilize pH levels and makes adjustments more effective.
- Make Gradual Adjustments: When adjusting the pH, add chemicals slowly and in small amounts. Retest the water after each addition to avoid overshooting your target pH range.
- Keep Records: Track your pH levels, test dates, and any adjustments you make. Keeping a log can help you identify patterns and anticipate when pH fluctuations are most likely to occur.
By incorporating these practices into your routine, you’ll ensure that your above ground pool stays in perfect balance all year long. Regular maintenance not only makes for a more enjoyable swimming experience but also helps protect your investment, keeping your pool in top condition season after season.
Conclusion
Keeping the pH levels in your above ground pool within the optimal range is key to enjoying a safe, clean, and comfortable swimming experience. By regularly testing and adjusting your pool’s pH, you can ensure that your water is always ready for a refreshing dip. Remember, maintaining the right pH is not just about protecting your pool—it’s about protecting your health and maximizing your investment. So, make pH management a regular part of your pool care routine, and you’ll enjoy trouble-free swimming all season long!

Leave a Reply