
Winter is coming, and if you own an above-ground pool, now’s the time to start thinking about how to protect it during the cold months ahead. Trust me, there’s nothing worse than opening your pool in the spring, only to find it damaged because it wasn’t properly winterized. I learned this the hard way a few years ago when I skipped a few steps—big mistake! In this guide, I’ll walk you through everything you need to know about winterizing your above-ground pool, from balancing the water chemistry to covering it securely. By following these steps, you can avoid costly repairs and enjoy a hassle-free start to the next swimming season.
Ready to upgrade your pool? Click the link to discover the best above ground pool options on the market! Find the perfect pool now!
Balance Your Pool’s Water Chemistry
Contents
Balancing your pool’s water chemistry before winter is like setting the foundation for a stress-free reopening in the spring. You might think it’s just an extra step, but trust me, getting those chemical levels right can make all the difference. Neglect this step, and you could be dealing with a swampy mess when you’re eager to jump in once the weather warms up.
So, why is this so crucial? When the water chemistry is off, your pool’s surfaces, equipment, and overall water quality can suffer during the cold months. If the pH is too high or low, it can lead to corrosion or scaling, damaging the pool liner and equipment. Similarly, if the alkalinity and calcium hardness aren’t in check, you might find yourself dealing with unsightly stains or even structural damage. And let’s not forget chlorine – it’s your main line of defense against algae and bacteria, which can still cause trouble even in cold temperatures.
Now, let’s talk about what you need to check:
- pH Level: Ideally, your pool’s pH should be between 7.4 and 7.6. This range ensures that the water isn’t too acidic or too basic, which helps prevent corrosion and scaling. If your pH is off, you’ll need to add a pH increaser or decreaser to bring it back to balance.
- Alkalinity: The alkalinity acts as a buffer for your pH, keeping it stable. You want this to be in the range of 80 to 120 ppm (parts per million). If it’s too low, the pH will fluctuate wildly, making it hard to maintain the right balance. To adjust alkalinity, you can use sodium bicarbonate to raise it or a pH decreaser to lower it.
- Calcium Hardness: This measures the amount of calcium dissolved in your water, and the sweet spot is between 200 to 400 ppm. If the calcium hardness is too low, the water becomes corrosive, eating away at your pool surfaces. Too high, and you’ll start to see scale build-up. You can adjust calcium hardness by adding calcium chloride if it’s too low or diluting your pool water if it’s too high.
- Chlorine: Finally, keep your chlorine levels between 2.0 and 4.0 ppm. This level is strong enough to fend off bacteria and algae, which could otherwise turn your pool into a green nightmare by spring. If your chlorine levels are low, consider adding more chlorine or using a shock treatment to give it a boost before the winter cover goes on.
Adjusting these levels isn’t just about dumping chemicals in and hoping for the best. It’s a process that may take a few days of testing and tweaking to get just right. Start about a week before you plan to close the pool to give yourself enough time to stabilize everything. By taking the time to balance your pool’s water chemistry now, you’re setting yourself up for a much smoother and less stressful pool opening next season.
Shock the Pool

Before you tuck your pool away for the winter, giving it a good shock is absolutely essential. Think of it as giving your pool one last deep clean to ensure it stays fresh and clear throughout the cold months. Shocking the pool before closing helps eliminate any lingering contaminants, such as algae spores, bacteria, or organic matter, that could otherwise cause your water to turn cloudy or green over the winter. Trust me, it’s much easier to shock the pool now than to deal with a mess when you reopen it in the spring.
Now, when it comes to choosing the right shock treatment, you have two main options: chlorine-based shocks and non-chlorine-based shocks. Both have their merits, so it really depends on what your pool needs at this stage.
- Chlorine Shock: This is the most common type of shock treatment and is highly effective at killing bacteria and algae. If your pool has been heavily used or if you’re noticing any signs of algae, chlorine shock is your go-to. It’s a powerful oxidizer that breaks down organic contaminants, leaving your pool water clean and sanitized. However, it does temporarily raise chlorine levels, so you’ll want to do this a few days before closing to let those levels settle down a bit.
- Non-Chlorine Shock: If you’ve kept your pool pretty pristine throughout the season and your chlorine levels are already stable, a non-chlorine shock might be the better choice. This type of shock works by oxidizing contaminants without adding more chlorine to the water. It’s a great option if you want to avoid increasing chlorine levels right before closing, especially if you’re using a winterizing chemical kit that already includes chlorine. Non-chlorine shock is also gentler on pool liners and equipment, which is something to consider if you’re aiming for long-term maintenance.
So, how much shock should you use? The general rule of thumb is to use one pound of shock for every 10,000 gallons of water. However, this can vary depending on the product you’re using and the current condition of your pool. If your water is cloudy or showing signs of algae, you might need to double the dose to make sure everything is properly sanitized. On the other hand, if your water is already clear and balanced, sticking to the standard dosage should suffice.
Here’s a quick guide to help you out:
- For a 10,000-gallon pool, use 1 pound of shock.
- For a 20,000-gallon pool, use 2 pounds of shock.
- For a 30,000-gallon pool, use 3 pounds of shock.
When applying the shock, it’s best to do it in the evening or late afternoon, as sunlight can reduce its effectiveness. Simply dissolve the shock in a bucket of water before spreading it evenly across the pool’s surface. And remember, run your pool pump for several hours afterward to help circulate the shock and ensure it’s working throughout the entire pool.
Shocking your pool before winter isn’t just a step in the process; it’s a crucial one. It ensures that when you peel back the cover in the spring, you’ll be greeted with clear, clean water instead of an unpleasant surprise. So take the time to choose the right shock and apply it correctly—you’ll thank yourself when pool season rolls around again!
Thoroughly Clean the Pool
:max_bytes(150000):strip_icc():format(webp)/gettyaboveclean-5c013201c9e77c00012ea46e.jpg)
Before you say goodbye to your pool for the winter, it’s crucial to give it one last, thorough clean. This isn’t just a quick sweep or a half-hearted attempt at skimming; it’s about making sure every inch of your pool is spotless. A clean pool at closing means fewer headaches when you reopen it in the spring. Trust me, a little effort now can save you a lot of frustration later on.
Here’s how you can get your pool sparkling clean before winter sets in:
- Vacuuming: Start by vacuuming the pool floor to remove any dirt, leaves, or debris that have settled at the bottom. Even if your pool looks clear, there can still be particles that will cause problems over the winter. A manual vacuum gives you the most control and lets you target specific areas, but if you’re short on time, an automatic pool cleaner can get the job done as well. Just be sure to go over every corner, including steps and ladders, where debris can hide.
- Brushing the Walls: Once the floor is clean, it’s time to focus on the walls. Algae and other contaminants love to cling to pool walls, especially in spots where circulation is poor. Use a good-quality pool brush to scrub the walls, steps, and even the floor for good measure. Don’t forget to brush around fixtures like lights and skimmers, where grime tends to accumulate. This step is key to preventing algae growth and staining over the winter months, so don’t skip it!
- Skimming the Surface: After vacuuming and brushing, there’s likely to be debris floating on the water’s surface. Grab your trusty pool skimmer and remove any leaves, bugs, or other floating debris. A clean surface not only looks better but also helps prevent organic matter from breaking down and affecting your water chemistry over the winter.
Taking these cleaning steps seriously is your best defense against algae and staining. If you leave debris or algae in the pool, it can lead to ugly stains and green water when you uncover the pool in the spring. Algae spores can survive the winter, especially in warmer climates or if your cover isn’t 100% secure. And once algae get a foothold, it’s a nightmare to get rid of. That’s why brushing and vacuuming are so important—they help ensure there’s nothing left behind to fester.
Now, let’s talk about the tools and products that can make this whole process easier:
- Pool Vacuum: A manual vacuum is a reliable choice for deep cleaning, but if you’re looking for convenience, an automatic pool cleaner or robotic vacuum can save you time. These devices are great for doing the heavy lifting, especially in larger pools.
- Pool Brush: Choose a brush that’s suitable for your pool’s surface—nylon brushes for vinyl and fiberglass pools, and stainless steel brushes for concrete or plaster pools. Having the right brush can make a big difference in how effectively you can scrub away grime and algae.
- Leaf Skimmer: A durable, deep-net skimmer is your best friend when it comes to removing floating debris. Look for one with a sturdy frame and a long handle so you can easily reach all areas of the pool.
- Algaecide: After cleaning, consider adding an algaecide to your pool. This product helps prevent algae growth over the winter and can give you extra peace of mind, especially if you’ve had issues with algae in the past.
- Pool Cover Pump: If you’re using a winter cover, a cover pump is a must-have. It helps remove rainwater and snow melt from the cover, preventing it from sagging and allowing debris to slip into the pool.
Cleaning your pool thoroughly before closing it for the winter isn’t just about aesthetics; it’s about protecting your investment and ensuring you have a clean, clear pool ready to go when spring arrives. By vacuuming, brushing, and skimming, and using the right tools and products, you can rest easy knowing your pool is well-prepared to weather the cold months ahead.
Remove and Store Pool Accessories
As you prepare your pool for winter, one of the often-overlooked but crucial steps is removing and properly storing all your pool accessories. These items can be easily damaged by freezing temperatures, so it’s important to get them out of the water and safely stored away. Trust me, it’s a step you don’t want to skip—leaving these accessories in the pool during winter can lead to costly replacements come spring.
What Needs to Be Removed?
- Ladders: Pool ladders are usually made of metal or plastic, and both materials can suffer from exposure to cold and fluctuating temperatures. Metal ladders can corrode or weaken, while plastic ladders may crack or warp if left out in freezing conditions. Carefully detach your pool ladder and rinse it off to remove any chlorine or chemical residue.
- Skimmer Baskets: Skimmer baskets are another must-remove item. These baskets are designed to catch debris like leaves and bugs, but if left in the pool over winter, they can become brittle and break. Additionally, water left in the skimmer can freeze and expand, causing damage to the skimmer housing itself. Remove the baskets, clean them out, and store them in a dry place.
- Pool Toys: Any pool toys, floats, or inflatables should also be taken out of the water. Even though these items are designed to float, prolonged exposure to cold weather can cause them to deflate, crack, or become brittle. It’s best to rinse them off, let them dry completely, and store them in a cool, dry place away from direct sunlight.
- Pool Covers and Solar Blankets: If you have a solar blanket or any type of pool cover that you use during the swimming season, it should be thoroughly cleaned, dried, and stored away as well. Winterizing your pool with a proper winter cover is essential, and any other covers should be removed to prevent damage from snow, ice, or freezing temperatures.
How to Store Pool Accessories
Storing your pool accessories properly is just as important as removing them. Here’s how to ensure they’re protected throughout the winter:
- Clean and Dry Everything: Before storing, make sure to clean off any dirt, grime, or chemical residue from your pool accessories. This helps prevent corrosion or deterioration while they’re in storage. Let everything dry completely to avoid mold or mildew growth.
- Store in a Dry, Sheltered Area: Pool accessories should be stored in a dry place that’s protected from the elements. A garage, shed, or even a dedicated storage box works well. If you’re storing items like inflatables or solar blankets, make sure they’re not compressed or stacked in a way that could cause them to lose shape or get damaged.
- Keep Small Parts Together: For items that come with small parts, like skimmer baskets or ladder fittings, it’s a good idea to keep these parts together in labeled bags or containers. This will save you a lot of time and hassle when it’s time to set up your pool again in the spring.
Why You Shouldn’t Leave Accessories in the Pool
Leaving any accessories in the pool over winter is a recipe for disaster. Here’s why:
- Freeze Damage: The most obvious reason is freeze damage. Water expands as it freezes, and if it’s trapped inside or around your pool accessories, it can cause them to crack, warp, or even break. This is particularly true for skimmer baskets, ladders, and other components that have hollow spaces where water can collect.
- Corrosion and Deterioration: Even if your pool doesn’t freeze solid, cold temperatures and prolonged exposure to moisture can lead to rust, corrosion, or deterioration of your pool accessories. Metal parts are especially susceptible to corrosion, while plastic components can become brittle and prone to cracking.
- Safety Concerns: Leaving accessories in the pool can also create safety hazards. For example, a ladder left in the pool can become loose or unstable after a winter of freezing and thawing. This can pose a danger when someone tries to use it the following season.
By taking the time to remove and store all pool accessories properly, you’re not just protecting your investment but also ensuring that your pool will be in great shape and ready for use when the weather warms up. Plus, it’s one less thing to worry about when you’re eager to jump back into the pool next season!
Lower the Water Level
One of the key steps in winterizing your above-ground pool is lowering the water level. This step is crucial to protecting your pool from the potential damage that freezing temperatures can cause. However, it’s important to get the water level just right—too much or too little can create problems down the line. Let’s dive into how to properly lower your pool’s water level and why it matters.
The Correct Water Level for Winterizing Your Pool
When preparing your pool for winter, you’ll want to lower the water level to about 4 to 6 inches below the skimmer opening. This is the ideal level to prevent water from entering the skimmer and freezing, which could cause cracking or damage to the skimmer and other pool equipment. The exact amount can vary slightly depending on your pool’s setup and the type of cover you’re using, but staying within this range is generally a safe bet.
How to Safely Drain Water from Your Pool Without Damaging the Liner
Draining water from your pool may seem straightforward, but doing it incorrectly can cause issues, especially if you have a vinyl liner. Here’s how to do it safely:
- Use a Submersible Pump or Siphon Hose: The easiest way to lower the water level is by using a submersible pump or a siphon hose. Simply place the pump or hose at the desired level and start draining. If you’re using a siphon, make sure to start the flow gently to avoid any sudden pressure changes that could disturb the liner.
- Avoid Draining Too Much: It’s crucial not to over-drain your pool. If the water level drops too low, the liner can become loose or even shrink, especially during cold weather. This can cause wrinkles or permanent damage, making your pool difficult to reopen in the spring.
- Keep the Liner in Mind: While draining, be mindful of the liner’s position. If you notice the liner starting to shift or pull away from the pool walls, stop draining immediately. It’s important to keep enough water in the pool to maintain tension on the liner, ensuring it stays in place and avoids damage.
- Disperse Water Properly: As you’re draining the water, make sure it’s being dispersed away from the pool and your home’s foundation. Pool water contains chemicals that can harm plants and lawns if not properly drained. Direct the water to a storm drain or a safe area where it won’t cause damage.
The Risks of Not Lowering the Water Level Enough
Failing to lower the water level to the correct height before winter can lead to a number of problems:
- Freeze Damage: If the water level is too high, it can enter the skimmer and freeze. As water freezes, it expands, which can crack the skimmer and damage the plumbing. This can result in costly repairs and a delayed pool opening in the spring.
- Pressure on the Cover: If your water level is too high, it can put extra pressure on the winter cover. This not only risks damaging the cover but can also lead to water and debris seeping into the pool. Over time, this can create a mess that’s difficult to clean up when you reopen the pool.
- Structural Damage: Excess water in the pool can freeze and expand, which puts additional stress on the pool walls. This is especially risky for above-ground pools, as the walls are more vulnerable to damage from expanding ice. Lowering the water level reduces this risk by giving the ice room to expand without pushing against the pool walls.
By carefully lowering the water level to the recommended height and doing so in a safe manner, you’re taking an important step in protecting your pool from the harsh winter conditions. This simple yet critical action helps ensure that your pool remains in good shape, making for an easier and more enjoyable opening when the warmer weather returns.
Drain and Store Pool Equipment
As you prepare your pool for the winter months, one of the most important tasks is draining and properly storing your pool equipment. Your pump, filter, and heater are the heart of your pool system, and taking the time to winterize them correctly can save you from expensive repairs or replacements when spring rolls around. Let’s walk through the steps to ensure your equipment stays in top condition throughout the off-season.
How to Drain and Store Your Pool Pump, Filter, and Heater
- Draining the Pool Pump: Start by turning off the power to the pump to avoid any electrical accidents. Next, remove the drain plugs from the pump to allow any remaining water to escape. Be sure to let all the water drain out, as any residual water left inside the pump can freeze and cause damage. Once drained, it’s a good idea to remove the pump and store it indoors. If removing it isn’t feasible, cover the pump with a waterproof tarp or a specialized pool pump cover to protect it from the elements.
- Draining the Filter: For the filter, begin by turning off the pump and setting the filter to the “Winterize” or “Drain” position if your model has one. Remove the drain plug and allow the water to drain completely. If you have a sand filter, it’s not necessary to remove the sand, but you should make sure it’s dry. Cartridge filters should be removed, cleaned thoroughly, and stored indoors to prevent them from cracking or becoming brittle. If you have a DE (Diatomaceous Earth) filter, make sure to clean out all the DE powder and rinse the grids before storage.
- Draining the Heater: Pool heaters are particularly susceptible to freeze damage, so it’s vital to drain them completely. Start by shutting off the gas or electricity to the heater. Open the pressure relief valve to release any remaining water. Then, remove the drain plug(s) and tilt the heater slightly to ensure all water has drained out. For added protection, consider blowing out any remaining water with a shop vacuum or air compressor. After draining, it’s best to disconnect the heater and store it indoors if possible, or at least cover it securely with a weatherproof cover.
Tips for Protecting Your Equipment from Freeze Damage
Freeze damage is a common issue with pool equipment during the winter, but it’s entirely preventable with the right precautions:
- Ensure Complete Drainage: The most critical step in preventing freeze damage is making sure all water is drained from your pump, filter, and heater. Even a small amount of water left inside can freeze and expand, leading to cracks or other damage.
- Use a Shop Vacuum or Air Compressor: After draining, consider using a shop vacuum or air compressor to blow out any remaining water from pipes, hoses, and equipment. This extra step helps ensure there’s no water left to freeze and cause damage.
- Cover Exposed Equipment: If you can’t store your equipment indoors, covering it with a weatherproof tarp or specialized cover is essential. This helps protect the equipment from snow, ice, and rain, which can lead to rust or further damage.
The Importance of Storing Equipment Indoors if Possible
Storing your pool equipment indoors during the winter is the best way to protect it from the harsh elements. Here’s why it’s so important:
- Temperature Control: Indoors, your equipment is shielded from freezing temperatures that can cause water to freeze inside pumps, filters, and heaters. This is the most effective way to prevent freeze damage.
- Protection from the Elements: Indoors, your equipment is safe from snow, ice, rain, and debris that could lead to rust, corrosion, or mechanical failures. Even a waterproof cover can’t provide the same level of protection as indoor storage.
- Extended Lifespan: Properly storing your equipment indoors not only prevents winter damage but also helps extend the lifespan of your pool components. By avoiding unnecessary wear and tear, your pump, filter, and heater will continue to function efficiently for many years.
Draining and storing your pool equipment might seem like a tedious task, but it’s a crucial part of winterizing your pool. By taking the time to do it right, you’ll protect your investment and ensure that your pool is ready to go when the warmer months return. Whether you’re storing equipment indoors or covering it outside, these steps will help you avoid costly repairs and keep everything running smoothly for the next swim season.
Add Winterizing Chemicals
Adding winterizing chemicals to your pool is a critical step in protecting it from the harsh conditions of winter. These chemicals are designed to maintain water quality and prevent algae growth, staining, and scaling while your pool is closed. Let’s break down what’s typically included in a winterizing chemical kit, how to apply these chemicals effectively, and some specific products that are particularly well-suited for above-ground pools.
Overview of Winterizing Chemical Kits and What They Include
Winterizing chemical kits are specifically formulated to keep your pool’s water balanced and clear during the off-season. While kits can vary slightly depending on the brand and the specific needs of your pool, they generally include the following components:
- Algaecide: This is a powerful agent that helps prevent algae from taking hold over the winter. Algae can still thrive in colder temperatures if not properly treated, so this is a key ingredient in any winterizing kit.
- Stain and Scale Preventer: This chemical is used to prevent the buildup of minerals that can cause staining or scaling on your pool’s surfaces. It’s particularly important in areas with hard water, where mineral deposits are more likely to occur.
- Shock Treatment: While you may have already shocked your pool before starting the winterizing process, most kits include an additional shock treatment. This helps to oxidize any remaining organic contaminants, ensuring that your pool water remains clean and free of bacteria.
- Floating Dispensers or WinterPill: Some kits include a floating dispenser or a WinterPill, which slowly releases chemicals throughout the winter. This helps maintain the effectiveness of your winterizing efforts over several months.
How to Apply These Chemicals for Best Results
To get the best results from your winterizing chemicals, it’s important to follow a few key steps:
- Balance Your Pool Water: Before adding winterizing chemicals, make sure your pool’s water chemistry is properly balanced. The pH, alkalinity, calcium hardness, and chlorine levels should all be within the recommended ranges. This step is crucial because balanced water will allow the chemicals to work more effectively.
- Add the Chemicals in the Right Order: Start by adding the algaecide, followed by the stain and scale preventer. If your kit includes a shock treatment, apply that next. It’s generally a good idea to run your pool pump for a few hours after adding each chemical to ensure they are evenly distributed throughout the water.
- Use a Floating Dispenser or WinterPill: If your kit includes a floating dispenser or WinterPill, place it in the pool after the initial chemicals have been added. This device will continue to release chemicals over time, helping to maintain the pool’s water quality throughout the winter.
- Cover the Pool: Once all the chemicals have been added and circulated, cover your pool with a winter cover. Make sure the cover is securely fastened to keep out debris and prevent any dilution of the chemicals by rain or snow.
Specific Products Recommended for Above-Ground Pools
When it comes to choosing winterizing chemicals for above-ground pools, a few products stand out for their effectiveness and ease of use:
- In The Swim Pool Winterizing Kit: This kit is popular for both above-ground and in-ground pools and comes in different sizes based on your pool’s volume. It includes a powerful algaecide, stain and scale preventer, and shock treatment, all designed to work together to keep your pool in great shape over the winter.
- HTH Pool Care Winter Kit: Another highly recommended option, the HTH kit includes an algaecide, a non-chlorine shock treatment, and a scale and stain inhibitor. It’s particularly good for above-ground pools and is known for being easy to use, even for those who are new to pool care.
- AquaPill WinterPill: For those looking for a simple, all-in-one solution, the AquaPill WinterPill is a fantastic option. It’s a small, floating device that gradually releases a combination of algaecide, scale inhibitor, and enzymes to keep your pool water clean and clear throughout the winter. It’s especially convenient for above-ground pool owners who want a low-maintenance solution.
Adding winterizing chemicals is a key step in protecting your pool during the off-season. By choosing the right products and applying them correctly, you can ensure that your pool remains in top condition, making for a smooth and easy opening when spring arrives.
Install Air Pillows

When it comes to winterizing your above-ground pool, installing air pillows is an essential step that can save you from a lot of headaches. Air pillows, also known as ice compensators, play a crucial role in protecting your pool during the winter months by preventing damage caused by the expansion of ice. Let’s explore what air pillows do, how to properly place them in your pool, and tips for securing them to keep everything in place throughout the cold season.
What Air Pillows Do and Why They’re Important
Air pillows are inflatable devices that are placed under your pool cover in the center of the pool. Their primary purpose is to absorb the pressure created by expanding ice as temperatures drop. When water freezes, it expands, and in a confined space like a pool, this can lead to significant stress on the pool walls and liner. Without an air pillow, the expanding ice could push outward against the pool walls, potentially causing cracks, leaks, or even structural failure.
By placing an air pillow in your pool, you create a buffer that helps distribute the ice’s pressure more evenly. Instead of pushing outward, the ice is directed inward toward the air pillow, reducing the strain on your pool’s walls and preventing costly damage. Additionally, air pillows help keep the pool cover from sagging by raising it in the center, which allows water, snow, and debris to run off more easily.
How to Properly Place Air Pillows in Your Pool
Proper placement of air pillows is key to ensuring they do their job effectively. Here’s a step-by-step guide to getting it right:
- Inflate the Air Pillow: Start by inflating the air pillow to about 60-70% of its full capacity. You don’t want it fully inflated because it needs to have some give to absorb the pressure of the ice. Plus, overinflating can increase the risk of the pillow popping during the winter.
- Position the Air Pillow: Place the inflated air pillow in the center of your pool. The exact placement is important—if it’s too far to one side, it won’t effectively absorb the ice pressure. The goal is to have the air pillow directly in the middle so that it evenly distributes the force as the ice expands.
- Attach the Pillow to Your Pool: Most air pillows come with grommets or loops on the corners, which you can use to attach the pillow to the pool’s sides. Run a strong rope or cord through the grommets and secure it to the pool’s edge. This helps keep the pillow in place, preventing it from drifting as you install the cover.
Tips for Securing Air Pillows to Prevent Shifting During Winter
To ensure your air pillow stays in place throughout the winter, consider these additional tips:
- Use Multiple Air Pillows for Large Pools: If you have a larger pool, using just one air pillow might not be enough to cover the entire surface. In such cases, it’s better to use two or more air pillows, strategically placed and secured, to cover a broader area and provide more effective protection.
- Cross-Tie for Stability: To keep the air pillow from shifting, you can cross-tie it with ropes in an “X” pattern. Secure one end of the rope to the pool’s edge, run it through the pillow’s grommet, and then tie it off on the opposite side. Repeat this process in the other direction to create a stable, cross-tied setup that holds the pillow in place.
- Check the Pillow After Cover Installation: Once you’ve installed the pool cover, take a moment to check the pillow’s position. The cover can sometimes pull the pillow off-center as you secure it, so make any necessary adjustments to keep the pillow aligned.
- Use Pillow Weights or Anchors: If your pool is in a particularly windy area, or you’ve had issues with pillows shifting in the past, consider using weights or anchors designed for pool pillows. These can be attached to the pillow and help keep it securely in place, even in rough weather.
Installing air pillows is a simple but effective way to protect your pool from the damaging effects of ice expansion during the winter. By taking the time to position and secure your air pillows correctly, you can ensure that your pool stays in great condition, making for an easy and stress-free opening when spring arrives.
Cover Your Pool
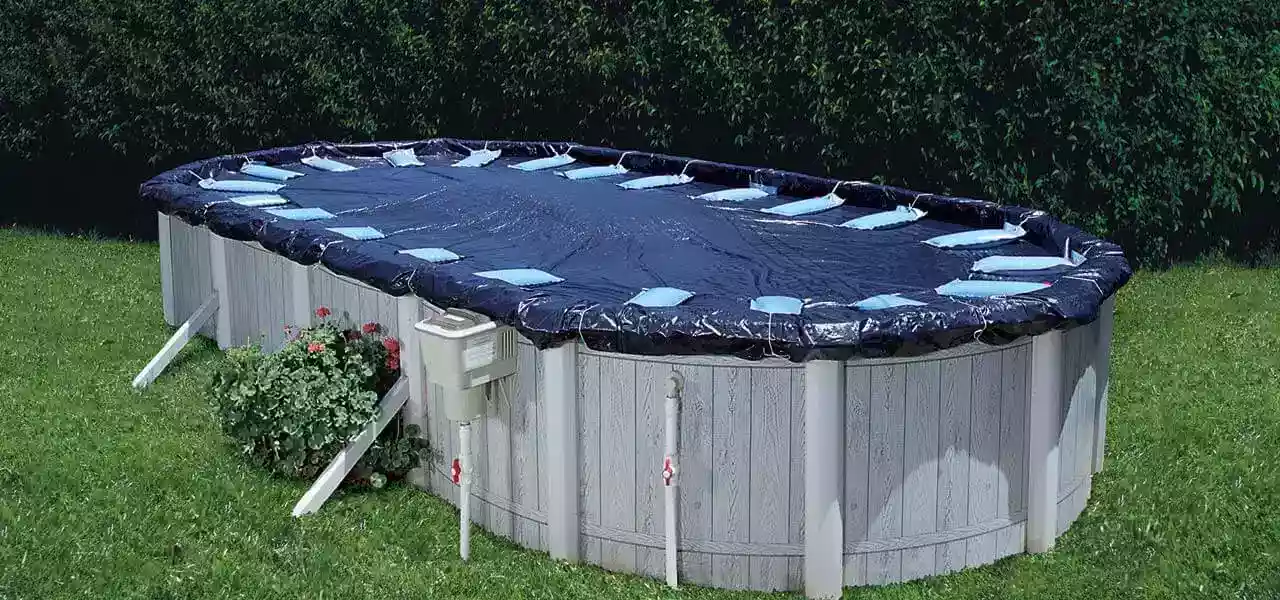
Once you’ve completed all the necessary steps to winterize your pool, the final and crucial task is covering it properly. A good winter cover is your pool’s first line of defense against debris, harsh weather, and unwanted contaminants. Let’s explore how to choose the right winter cover, how to securely install it, and the importance of using a cover pump to manage water accumulation.
Choosing the Right Winter Cover for Your Pool
Selecting the right winter cover for your pool is essential to ensuring it remains protected throughout the off-season. Here are the main types of winter covers and what you should consider when choosing one:
- Solid Covers: These are made of heavy-duty, reinforced material that blocks out sunlight and keeps debris, dirt, and water from entering the pool. Solid covers are excellent for maintaining clean water and preventing algae growth, as they prevent light and organic matter from getting into the pool. Look for a cover with a built-in drain or mesh panel to allow excess water to escape while keeping debris out.
- Mesh Covers: Mesh covers are lighter and easier to handle than solid covers. They allow water to drain through while keeping out leaves and large debris. Mesh covers are ideal if you prefer not to worry about pumping off accumulated water, but they may allow some fine particles and light to pass through, which could lead to minor algae growth.
- Safety Covers: If you have children or pets, a safety cover is the best choice. These covers are designed to be sturdy and can support weight if someone accidentally walks onto the cover. Safety covers come in both mesh and solid versions, offering the benefits of both while adding an extra layer of protection against accidents.
- Custom Covers: If your pool has an irregular shape or unique features, a custom cover might be necessary. Custom covers are tailored to fit your pool perfectly, ensuring full coverage and optimal protection.
When choosing a cover, make sure it’s appropriately sized for your pool and made from durable, UV-resistant material. A high-quality cover is an investment that will last several seasons and provide superior protection.
How to Securely Install the Cover to Keep Out Debris
Installing your winter cover securely is vital to keeping out debris and ensuring the cover stays in place throughout the winter. Here’s how to do it right:
- Lay the Cover Over the Pool: Start by laying the cover flat over the pool’s surface, making sure it’s centered and that all edges extend equally around the pool.
- Attach the Cover to the Pool: Most covers come with a series of loops or grommets around the edge. Use the provided cable and winch to secure the cover tightly around the pool’s perimeter. For above-ground pools, secure the cover by threading the cable through the grommets and tightening it with the winch. If you have an in-ground pool, use water bags or cover weights along the edges to hold the cover in place.
- Use Cover Clips or Straps: For added security, use cover clips or straps to fasten the cover to the pool’s sides. This helps prevent the cover from being
Final Checks Before Winter Sets In
As you wrap up the winterization process for your pool, it’s essential to take a moment for final checks. These last steps ensure that everything is properly secured, stored, and ready to withstand the winter months. By double-checking your work now, you’ll set yourself up for an easy and stress-free pool opening when spring rolls around. Here’s how to make sure everything is in order before winter sets in.
Double-Checking That Everything Is Securely Covered and Stored
First, take a close look at your pool cover and all the accessories you’ve removed and stored. It’s easy to overlook small details, but these can make a big difference in how well your pool fares through the winter.
- Inspect the Pool Cover: Walk around the perimeter of your pool to ensure that the cover is tightly secured and evenly positioned. Check that all the clips, straps, cables, or weights are firmly in place, and adjust them if necessary. The cover should be taut, with no significant gaps where debris could enter or where the cover could be lifted by wind.
- Check Stored Equipment: Make sure that all your pool equipment, such as the pump, filter, heater, and any accessories like ladders or skimmer baskets, are safely stored away from the elements. If you’ve stored these items indoors, confirm that they’re in a dry, secure location where they won’t be exposed to freezing temperatures or moisture.
- Verify Chemical Storage: If you have leftover pool chemicals, ensure they are stored in a cool, dry place, out of reach of children and pets. Proper storage of chemicals will help maintain their effectiveness for the next season.
The Importance of a Final Walk-Around to Catch Any Missed Steps
A final walk-around is a crucial part of the winterizing process. This is your chance to catch anything you might have missed and make sure everything is in perfect order before winter fully sets in.
- Look for Loose Ends: As you walk around your pool and storage areas, keep an eye out for any loose equipment, unsecured cover edges, or tools left behind. It’s easy to overlook these things when you’re focused on the bigger tasks, but taking the time to address them now can prevent problems later.
- Check Water Levels and Chemicals: Double-check that the water level is appropriately lowered, and that winterizing chemicals have been properly distributed throughout the pool. If you used a floating dispenser or WinterPill, make sure it’s functioning as intended.
- Inspect the Pool Area: Don’t forget to check the general pool area, including the deck and surrounding landscaping. Clear away any debris, furniture, or items that could blow into the pool or cause damage during a storm. If you have a pool fence or barrier, make sure it’s secure and intact.
Preparing for an Easy and Stress-Free Pool Opening in Spring
The ultimate goal of winterizing your pool is to make the spring opening as easy and stress-free as possible. By doing these final checks now, you’re ensuring that your pool will be in great condition when the warm weather returns.
- Make a Spring Checklist: As you go through your final walk-around, note any areas that might need attention when you reopen the pool. This could include small repairs, replacing parts, or cleaning tasks that will need to be done in the spring. Having a checklist ready will make the opening process smoother.
- Label Stored Items: If you haven’t already, label any stored equipment or parts. This simple step can save you time and hassle when you’re setting everything back up after winter.
- Relax Knowing You’re Prepared: With everything securely covered, stored, and checked, you can head into winter with peace of mind. You’ve done the hard work, and now you can relax knowing that your pool is well-protected and ready for another season of fun when the time comes.
By taking the time to perform these final checks before winter sets in, you’re not only protecting your pool but also setting yourself up for a much easier pool opening in the spring. It’s all about taking those extra few minutes now to ensure a worry-free winter and a smooth start to the next pool season.
Conclusion:
Winterizing your above-ground pool might seem like a daunting task, but trust me, it’s well worth the effort. By taking the time to balance the water chemistry, clean the pool thoroughly, and secure everything properly, you’re protecting your investment and ensuring a smooth opening next spring. So grab your pool cover, drain those pumps, and get ready to enjoy the peace of mind that comes with knowing your pool is safe and sound all winter long. And hey, if you’ve got any tips or winterizing hacks that have worked for you, feel free to share them in the comments below—we’re all in this together!

Leave a Reply