Having an above ground pool is a fantastic way to enjoy the summer, but maintaining it can be a bit of a chore, especially when it comes to keeping the chlorine levels just right. Did you know that improper chlorine levels are one of the leading causes of pool water problems? Whether it’s algae, bacteria, or just cloudy water, all these issues can stem from not managing your chlorine properly. In this guide, I’m going to walk you through everything you need to know about maintaining the proper chlorine levels in your above ground pool. From understanding what chlorine does to your pool, to testing and adjusting the levels, I’ve got you covered!
Ready to upgrade your pool? Click the link to discover the best above ground pool options on the market! Find the perfect pool now!
Understanding the Role of Chlorine in Your Pool
Contents
When it comes to keeping your above ground pool clean and safe, chlorine is your best friend. It’s the unsung hero of pool maintenance, tirelessly working behind the scenes to keep your water sparkling clear and free from harmful bacteria and algae. But why exactly is chlorine so essential for pool sanitation? Let’s dive in and break it down.
Why Chlorine is Essential for Pool Sanitation
First off, let’s talk about why chlorine is so critical. Think of chlorine as the guardian of your pool water. Every time someone swims, they introduce all kinds of contaminants—like sweat, oils, dirt, and even microorganisms—into the pool. Without something to combat these impurities, your pool would quickly turn into a breeding ground for bacteria and algae, making the water unsafe for swimming. This is where chlorine steps in. It disinfects the water by killing harmful pathogens, ensuring that your pool remains a safe and enjoyable place for you and your family.
How Chlorine Works to Keep Your Pool Water Clean
Now, how does chlorine actually work? It’s all about a chemical reaction. When chlorine is added to pool water, it forms hypochlorous acid and hypochlorite ions. These compounds are incredibly effective at killing bacteria and algae by breaking down their cell walls and oxidizing the organic materials present in the water. This oxidation process essentially neutralizes the contaminants, turning them into harmless substances. So, every time you add chlorine to your pool, you’re kickstarting a chemical process that works tirelessly to keep your water clean and clear.
The Difference Between Free Chlorine, Combined Chlorine, and Total Chlorine
Understanding chlorine doesn’t stop at just knowing it keeps your pool clean; it’s also important to know the different types of chlorine in your pool. You might have heard terms like free chlorine, combined chlorine, and total chlorine thrown around, and they each play a role in the health of your pool.
- Free Chlorine: This is the chlorine that’s free and available to sanitize your pool. It’s the chlorine actively working to keep your water clean by attacking harmful contaminants. When you test your pool water, this is the number you want to pay close attention to, as it indicates how effectively your pool is being sanitized.
- Combined Chlorine: When free chlorine reacts with contaminants in the pool, it forms combined chlorine, also known as chloramines. These chloramines are less effective at sanitizing your pool and are often responsible for the strong chlorine smell you sometimes notice. High levels of combined chlorine can cause skin irritation and eye discomfort, which is why it’s important to monitor and minimize its presence in your pool.
- Total Chlorine: Total chlorine is simply the sum of free chlorine and combined chlorine. While it gives you an overall picture of the chlorine in your pool, it’s the levels of free chlorine and combined chlorine that are most telling when it comes to pool maintenance.
By understanding these different types of chlorine, you can better manage your pool’s sanitation. Regular testing ensures that your free chlorine levels are sufficient, combined chlorine remains low, and your pool water stays clean and safe for everyone to enjoy.
In essence, chlorine is the powerhouse behind pool sanitation, working hard to keep your water safe and enjoyable. With a basic understanding of how it works and the different forms it takes in your pool, you’ll be better equipped to maintain a clean and inviting swimming environment all summer long.
Ideal Chlorine Levels for Above Ground Pools

Maintaining the ideal chlorine levels in your above ground pool is crucial for keeping the water safe and enjoyable for everyone. But what exactly are those ideal levels, and how do factors like temperature, sunlight, and pool usage impact them? Let’s explore the answers to these questions to help you keep your pool in perfect balance.
Recommended Chlorine Levels for Safe Swimming
For most above ground pools, the recommended free chlorine level should be between 1.0 and 3.0 parts per million (ppm). This range is considered safe for swimming, as it effectively sanitizes the water without causing irritation to swimmers. If the chlorine level drops below 1.0 ppm, the pool becomes vulnerable to bacteria and algae growth, which can make the water unsafe. On the other hand, if the chlorine level exceeds 3.0 ppm, it can cause skin irritation, red eyes, and a strong chlorine odor, making your swimming experience less enjoyable.
How Temperature, Sunlight, and Pool Usage Affect Chlorine Levels
Chlorine levels aren’t static; they fluctuate based on a variety of factors, including temperature, sunlight, and how often the pool is used.
- Temperature: Warmer water speeds up the evaporation of chlorine, meaning you’ll need to add chlorine more frequently during hot summer days. As the temperature rises, bacteria and algae also thrive more quickly, requiring more chlorine to keep the pool clean.
- Sunlight: The sun’s ultraviolet (UV) rays break down chlorine in the water, a process known as photolysis. This means that on bright, sunny days, your pool’s chlorine levels can decrease rapidly, sometimes by up to 50% in just a few hours! To counteract this, many pool owners use stabilizers like cyanuric acid, which helps protect chlorine from UV rays and keeps it active for longer periods.
- Pool Usage: The more people swimming in your pool, the quicker the chlorine will get used up. Swimmers introduce sweat, oils, and other organic materials into the water, all of which chlorine needs to sanitize. After a pool party or a day with heavy usage, you might notice a dip in chlorine levels, so it’s important to check and adjust accordingly.
Why It’s Important to Maintain Consistent Chlorine Levels
Consistency is key when it comes to chlorine levels. Allowing chlorine levels to fluctuate too much can lead to a host of problems. If the levels drop too low, your pool becomes a breeding ground for bacteria and algae, which can quickly turn your pool into a murky mess. Low chlorine levels also mean that harmful pathogens could be present in the water, putting swimmers at risk of infections or illnesses.
On the flip side, keeping chlorine levels too high isn’t ideal either. Over-chlorination can cause skin and eye irritation, dry out your hair, and give off that harsh chlorine smell that no one likes. Additionally, too much chlorine can even start to damage your pool liner and equipment over time.
That’s why regular testing and consistent adjustments are essential. By maintaining the recommended chlorine levels, you ensure that your pool stays safe, clean, and ready for swimming whenever you are. It’s a bit of work, but the payoff is a sparkling, healthy pool that everyone can enjoy without worry.
So, remember: keep an eye on those chlorine levels, especially during hot days, after heavy use, or when the sun is shining bright. A little attention each day goes a long way in maintaining the perfect balance for your above ground pool!
How to Test Chlorine Levels in Your Pool
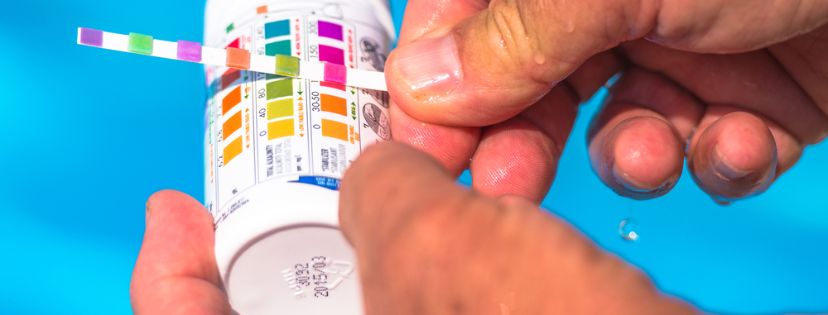
Testing the chlorine levels in your pool is a simple yet crucial part of maintaining a clean and safe swimming environment. But with so many tools and methods available, it can be a bit overwhelming to know where to start. Don’t worry—I’ve got you covered with everything you need to know to test your pool’s chlorine levels accurately and effectively.
Tools and Kits You Can Use to Test Chlorine Levels
There are a few different tools you can use to test the chlorine levels in your pool, each with its own pros and cons. The most common options include:
- Test Strips: These are perhaps the easiest and most convenient option. Test strips are small, paper-like strips that you dip into your pool water. After a few seconds, the strip will change color, which you then compare to a color chart on the packaging to determine your chlorine level. They’re quick, easy to use, and fairly accurate for day-to-day testing.
- Liquid Test Kits: These kits are a bit more involved but offer more precise results. With a liquid test kit, you’ll collect a sample of your pool water in a test tube, add a few drops of reagent, and then compare the resulting color to a chart. Liquid test kits are great for those who want more accuracy and are willing to take a few extra steps.
- Digital Testers: For the tech-savvy, digital testers offer the most accurate and convenient method of testing chlorine levels. Simply dip the tester’s probe into the pool water, and the device will display the chlorine level on a screen. While more expensive, digital testers are a great investment if you want the most reliable results with minimal effort.
Step-by-Step Guide to Testing Pool Chlorine Accurately
Testing your pool’s chlorine levels is straightforward, but there are a few key steps to ensure you get accurate readings:
- Choose the Right Time: It’s best to test your pool water in the evening or early morning, as the chlorine levels can fluctuate during the day due to sunlight and pool usage.
- Collect a Water Sample: If you’re using a liquid test kit or digital tester, start by collecting a sample of pool water. Hold the sample container at elbow depth (about 18 inches) below the surface to get a representative sample. This avoids any surface contaminants or debris that might skew your results.
- Perform the Test:
For Test Strips: Dip a test strip into the water and hold it there for a few seconds. Remove it and wait for the color to develop. Compare the color of the strip to the chart provided on the packaging to determine the chlorine level.
For Liquid Test Kits: Add the required number of reagent drops to your water sample according to the instructions. Shake the test tube gently and observe the color change. Compare it to the color chart to find your chlorine level.
For Digital Testers: Simply dip the probe into your water sample, and wait for the digital reading to appear on the screen.
- Record the Results: It’s a good idea to jot down your chlorine levels after each test. Keeping a log helps you track trends and identify when adjustments might be necessary.
How Often You Should Test Your Pool Water
Regular testing is essential to keep your chlorine levels in check and your pool safe. Here’s a general guideline for how often you should be testing:
- Daily Testing: During the peak swimming season (summer months), it’s a good practice to test your pool water every day. This is especially important if your pool sees heavy use or is exposed to a lot of sunlight, which can cause chlorine levels to fluctuate more rapidly.
- Weekly Testing: In cooler months or if your pool isn’t used as frequently, testing once or twice a week should suffice. Even if you’re not swimming often, it’s still important to keep an eye on the water chemistry to prevent any issues from developing.
- After Adjustments or Shocking: Anytime you add chemicals to your pool, whether it’s chlorine, stabilizers, or algaecides, it’s important to test the water afterward to ensure the levels are where they should be.
By following these steps and testing your pool water regularly, you’ll have peace of mind knowing your chlorine levels are optimal. It’s a small effort that pays off big when it comes to maintaining a safe and enjoyable swimming environment for everyone.
Adjusting Chlorine Levels in Your Above Ground Pool
Maintaining the right chlorine levels in your above ground pool can feel like a balancing act, but it’s crucial for keeping your pool water safe and inviting. Whether your chlorine levels are too high or too low, knowing how to adjust them properly is key to ensuring a clean and comfortable swimming experience. Let’s go through the steps for handling both scenarios and explore safe methods for adding chlorine to your pool.
What to Do if Chlorine Levels Are Too High
High chlorine levels can be just as problematic as low levels. If your pool’s chlorine concentration exceeds 3.0 parts per million (ppm), it can cause skin and eye irritation, a strong chlorine smell, and even damage to your pool liner and equipment over time. Here’s what you can do if you find your chlorine levels are too high:
- Stop Adding Chlorine: This might seem obvious, but the first step is to stop adding any chlorine to the pool. If you’re using a chlorinator or chlorine floater, remove it temporarily until levels stabilize.
- Dilute the Water: One of the quickest ways to lower chlorine levels is to partially drain your pool and refill it with fresh water. By diluting the water, you effectively reduce the concentration of chlorine. Be sure to test the water again after refilling to ensure the levels have dropped to a safe range.
- Let the Sun Work: Sunlight naturally breaks down chlorine through a process called photolysis. If your chlorine levels are slightly elevated, simply allowing your pool to be exposed to direct sunlight can help reduce the levels. Remove the pool cover and let the sun do its job for a day or two.
- Use a Chlorine Neutralizer: If you need to lower the chlorine levels quickly, you can use a chlorine neutralizer, such as sodium thiosulfate. Follow the manufacturer’s instructions carefully, as adding too much neutralizer can result in chlorine levels dropping too low.
Steps to Take if Chlorine Levels Are Too Low
Low chlorine levels can lead to a host of issues, including algae growth, cloudy water, and an increased risk of harmful bacteria. If your chlorine levels fall below 1.0 ppm, it’s important to take action promptly:
- Shock the Pool: The most effective way to quickly raise chlorine levels is to shock the pool. Pool shock is a high dose of chlorine that quickly brings levels back to normal. Choose a shock product suitable for your pool type, and follow the instructions for the correct dosage. It’s best to shock your pool in the evening to avoid chlorine loss due to sunlight.
- Check Your Chlorinator or Floater: If you’re using a chlorinator or floater, make sure it’s functioning properly and has enough chlorine tablets or granules. Sometimes, low chlorine levels can be the result of an empty or clogged chlorinator.
- Regular Chlorine Addition: If the levels are only slightly low, you can simply add more chlorine to your pool manually. Measure the chlorine according to your pool size and add it to the water. Liquid chlorine or granular chlorine can be added directly to the pool, but be sure to distribute it evenly across the surface.
Safe Methods for Adding Chlorine to Your Pool
When adding chlorine to your pool, it’s important to do it safely to avoid accidents or damage to your pool. Here are some best practices:
- Use Proper Protective Gear: Chlorine is a strong chemical that can be hazardous if not handled properly. Always wear gloves and protective eyewear when handling chlorine products to avoid skin and eye irritation.
- Distribute Evenly: Whether you’re using liquid chlorine, granular chlorine, or tablets, make sure to distribute the chlorine evenly throughout the pool. For liquid and granular chlorine, it’s best to pour it slowly around the perimeter of the pool, avoiding any direct contact with the pool liner to prevent staining or bleaching.
- Pre-Dissolve Granular Chlorine: If you’re using granular chlorine, consider pre-dissolving it in a bucket of water before adding it to the pool. This helps ensure even distribution and prevents the granules from settling at the bottom of the pool, which can cause damage.
- Monitor After Addition: After adding chlorine, let your pool’s filtration system run for a few hours and then test the water again. This helps to ensure that the chlorine is properly mixed and that the levels are within the safe range before allowing anyone to swim.
By following these steps and using safe methods to adjust your chlorine levels, you’ll keep your above ground pool in top condition, ensuring a clean and safe swimming environment for everyone. Remember, consistency is key—regular testing and adjustments will help you maintain that perfect balance all season long.
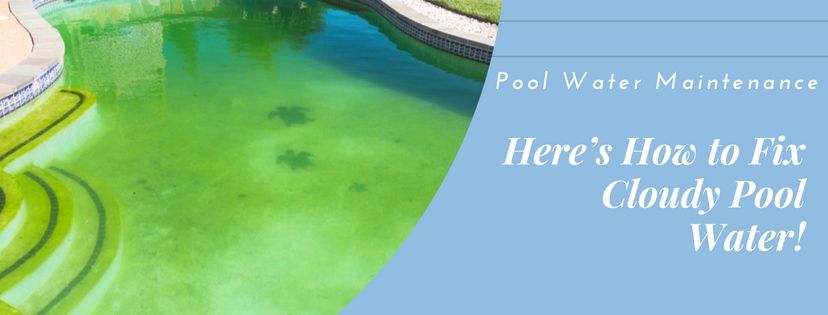
Common Chlorine Problems and How to Solve Them
Maintaining the right chlorine levels in your above ground pool is essential for keeping the water crystal clear and safe for swimming. However, even with regular testing and adjustments, you might still encounter some common chlorine-related issues like cloudy water, algae growth, or that unmistakable strong chlorine smell. Don’t worry—these problems are all solvable with the right approach. Let’s dive into the most common chlorine problems and how to fix them.
Troubleshooting Cloudy Water, Algae Growth, and Strong Chlorine Smell
Cloudy Water: Cloudy pool water is a common issue that can be caused by a variety of factors, but it’s often linked to improper chlorine levels. When chlorine isn’t doing its job effectively, contaminants like algae, bacteria, and debris can build up, leading to cloudy water. Here’s how to clear it up:
- Test and Adjust Chlorine Levels: Start by testing your pool’s chlorine levels. If they’re low, shock the pool to bring the chlorine back to the ideal range. If the levels are fine, check the pH and alkalinity, as imbalances here can also cause cloudiness.
- Run the Filtration System: Ensure your pool’s filtration system is running efficiently. Cloudy water often results from poor circulation. Run the filter continuously until the water clears up.
- Use a Clarifier: If the water remains cloudy, you can add a pool clarifier to help the filter trap small particles that are causing the cloudiness. This can speed up the clearing process.
Algae Growth: Algae can quickly take over your pool if chlorine levels are too low or if the water chemistry is unbalanced. Algae not only makes your pool look uninviting but can also make the surfaces slippery and unsafe. Here’s how to get rid of it:
- Shock the Pool: Algae is best treated by shocking the pool with a large dose of chlorine. This will kill the algae and help prevent it from coming back.
- Brush the Walls and Floor: After shocking the pool, use a pool brush to scrub the walls and floor to remove any remaining algae. This helps the chlorine penetrate and kill any algae that might be clinging to the surfaces.
- Run the Filter: Run your filter continuously to remove the dead algae from the water. You may need to backwash the filter or clean it out frequently during this process.
Strong Chlorine Smell: It might seem counterintuitive, but a strong chlorine smell usually indicates that your pool has too little effective chlorine, not too much. This smell is caused by chloramines—compounds formed when chlorine reacts with contaminants in the water. Here’s how to eliminate the odor:
- Shock the Pool: The best way to break down chloramines is by shocking the pool with a higher dose of chlorine. This will raise the free chlorine levels and eliminate the smell.
- Improve Circulation: Poor water circulation can lead to the buildup of chloramines. Ensure your pool’s pump and filter system are running efficiently to keep the water moving and clean.
Understanding Chlorine Lock and How to Fix It
Chlorine lock is a less common but frustrating problem that occurs when the chlorine in your pool becomes ineffective, no matter how much you add. This usually happens when the stabilizer level (cyanuric acid) in the water is too high, preventing the chlorine from doing its job. Here’s how to address chlorine lock:
- Test Cyanuric Acid Levels: The first step is to test your pool’s cyanuric acid levels. Ideal levels should be between 30 and 50 ppm. If it’s much higher, you’re likely dealing with chlorine lock.
- Partially Drain and Refill: To lower the cyanuric acid level and fix chlorine lock, you’ll need to partially drain your pool and refill it with fresh water. This dilutes the concentration of cyanuric acid, allowing chlorine to work effectively again.
- Re-Shock the Pool: Once you’ve adjusted the cyanuric acid levels, shock the pool to break the chlorine lock and bring your chlorine levels back to normal.
Preventative Measures to Avoid Common Chlorine Issues
The best way to deal with chlorine problems is to prevent them from happening in the first place. Here are some preventative measures you can take to avoid common chlorine issues:
- Regular Testing: Consistently test your pool’s chlorine, pH, alkalinity, and cyanuric acid levels. This allows you to catch and correct any imbalances before they turn into bigger problems.
- Routine Maintenance: Keep up with regular pool maintenance, including cleaning the pool surfaces, skimming debris, and running the filtration system daily. Proper maintenance prevents the buildup of contaminants that can lead to issues like cloudy water and algae.
- Shock the Pool Regularly: Even if everything seems fine, it’s a good idea to shock your pool regularly—about once a week during heavy use or after rainstorms—to keep chloramine levels in check and ensure your chlorine remains effective.
- Monitor Stabilizer Levels: Be mindful of your cyanuric acid levels. If you’re using stabilized chlorine, such as chlorine tablets, be aware that they add cyanuric acid to the water. Keep an eye on these levels to avoid chlorine lock.
By staying on top of these preventative measures, you can minimize the chances of encountering chlorine problems in your above ground pool. Regular testing, maintenance, and adjustments will keep your pool water clean, clear, and safe for swimming, allowing you to enjoy your pool with peace of mind.
Tips for Maintaining Proper Chlorine Levels All Season
Keeping your above ground pool’s chlorine levels in check all season long might seem like a daunting task, but with a few simple routines and adjustments, it becomes manageable and even second nature. By following best practices for maintenance, balancing chlorine with other pool chemicals, and making seasonal adjustments based on weather changes, you’ll ensure your pool stays safe, clean, and ready for swimming whenever you are.
Best Practices for Daily and Weekly Pool Maintenance
Consistent maintenance is the key to keeping your chlorine levels where they need to be. Here are some best practices to incorporate into your routine:
Daily Maintenance:
- Check and Adjust Chlorine Levels: Test your chlorine levels daily, especially during peak swimming season. This helps you catch any imbalances early before they become a bigger problem.
- Skim the Surface: Use a skimmer net to remove leaves, bugs, and other debris from the surface of the pool. This prevents the debris from breaking down and consuming your chlorine.
- Run the Filter: Ensure your pool’s filtration system is running for at least 8-12 hours a day. Proper circulation is essential for even chlorine distribution and effective sanitization.
Weekly Maintenance:
- Shock the Pool: Shocking your pool once a week is a good practice, especially after heavy use or rainstorms. This boosts your chlorine levels and helps eliminate chloramines and other contaminants.
- Vacuum the Pool: Use a pool vacuum to clean the bottom of your pool weekly. This removes any debris that might have settled and helps prevent algae growth.
- Brush the Walls and Floor: Brushing the walls and floor of your pool dislodges dirt and algae, allowing your chlorine to sanitize these areas more effectively.
How to Balance Chlorine with Other Pool Chemicals
Chlorine doesn’t work alone—it needs to be balanced with other pool chemicals to be effective. Here’s how to ensure everything is in harmony:
- pH Levels: Your pool’s pH level plays a critical role in how effective chlorine is at sanitizing the water. The ideal pH range is between 7.2 and 7.6. If the pH is too high, chlorine becomes less effective; if it’s too low, the water becomes too acidic, which can cause skin irritation and damage to pool equipment. Test your pH levels regularly and adjust with pH increaser or decreaser as needed.
- Alkalinity: Total alkalinity acts as a buffer for pH, helping to keep it stable. The recommended range for alkalinity is 80-120 ppm. If alkalinity is too low, pH levels can fluctuate more easily, affecting chlorine efficiency. Use alkalinity increaser or decreaser to maintain the correct levels.
- Cyanuric Acid (Stabilizer): Cyanuric acid helps protect chlorine from being broken down by the sun’s UV rays. The ideal range is 30-50 ppm. Too little stabilizer and your chlorine will dissipate quickly; too much, and you risk chlorine lock. Be mindful of stabilizer levels, especially if you use stabilized chlorine products like tablets or granules.
- Calcium Hardness: While not directly related to chlorine, calcium hardness affects the overall water balance. The recommended range is 200-400 ppm. Low calcium levels can lead to corrosion, while high levels can cause scaling. Maintaining proper calcium hardness helps protect your pool’s surfaces and equipment.
Seasonal Adjustments to Chlorine Levels Based on Weather Changes
Weather plays a significant role in how chlorine behaves in your pool. Here’s how to adjust your chlorine levels based on the changing seasons:
- Summer Months: During the hot summer months, chlorine is consumed more quickly due to higher temperatures, increased sunlight, and more frequent pool use. You’ll need to test and adjust chlorine levels more frequently. Consider using a stabilizer to help protect chlorine from UV degradation, and don’t be surprised if you need to add chlorine more often.
- Rainy Weather: Rain can dilute your pool water, lowering the chlorine levels and introducing contaminants like dirt and debris. After heavy rain, test your chlorine levels and adjust as needed. It’s also a good idea to shock the pool to help maintain water clarity and sanitation.
- Spring and Fall: During these transitional seasons, pool usage typically decreases, and so does the rate at which chlorine is consumed. You might not need to add chlorine as frequently, but continue to test the water regularly. As temperatures cool, you may also want to reduce the filtration time, but be sure to maintain a consistent routine to keep the water balanced.
- Winterizing Your Pool: If you live in a region where you need to close your pool for the winter, it’s important to give it one last shock before covering it. This helps ensure that the chlorine levels are sufficient to keep the water clean during the off-season. Once the pool is covered, you won’t need to add chlorine regularly, but you should check the water periodically to ensure it remains balanced.
By following these tips and staying on top of your pool’s maintenance routine, you’ll find it easier to keep your chlorine levels steady throughout the season. Remember, consistent care not only keeps your pool water safe and clear but also extends the life of your pool equipment and ensures a more enjoyable swimming experience. Happy swimming!
Conclusion
Maintaining proper chlorine levels in your above ground pool is key to ensuring a safe and enjoyable swimming experience. By regularly testing your water, making necessary adjustments, and following the tips provided, you’ll keep your pool sparkling clean and ready for fun all season long. Don’t forget, a well-maintained pool not only looks great but also helps prevent health issues related to improper water balance. So, grab your testing kit and take control of your pool’s chlorine levels today!

Leave a Reply